|
My first ever Blog
You are in for a treat’ Nice and Easy Mixed Media on a Budget We will be using wood glue and a variety of inexpensive, and easily obtainable mixed media materials to create fabulous journals and journal covers. Designed by Birdy Heywood 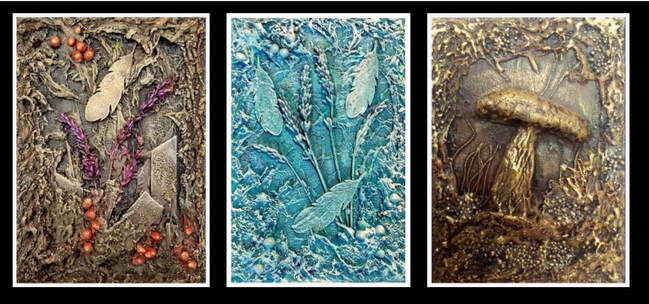 Beautiful things need not be expensive to create. I spent many years juggling the pennies to make ends meet. That also meant spending as little as possible on materials I used on my items for sale. Necessity is The Mother of Invention they say and I agree wholeheartedly. 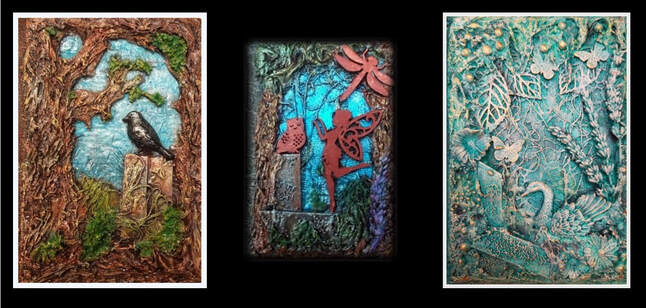 As an artist and crafter I have collected lots of bits and bobs over the years. I have put some of them to use on the journals you see here. I will list items as we proceed with the step by step instructions. The main ingredient is all purpose wood glue. 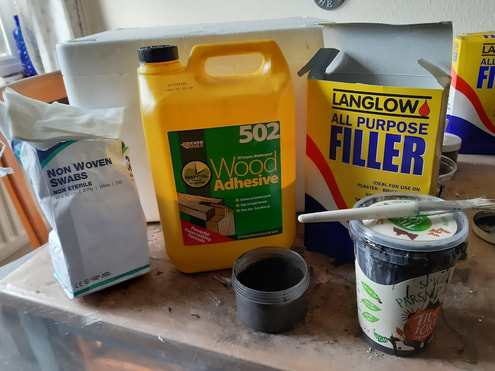 This is the wood glue I usually use. Mixed with the filler it creates an air drying paste that when cured, is strong, and solid. The Pearlescent Pigments can be mixed with varnish then applied like paint to give that extra bit of magical sparkle. Wood glue is water based so always have a pot of water handy to clean your paint brushes in. 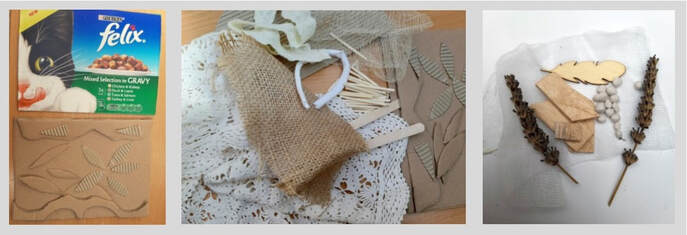 Now for a list of things that can be used to decorate your journals or canvases. If I have forgotten to add anything it will be included in the following step by step instructions. I have used cardboard as a base for the covers. The boxes the cat food sachets comes in are actually just the right size for a journal cover and approx. A 5 size. Cardboard can be cut easily to create all manner of shapes to add texture. 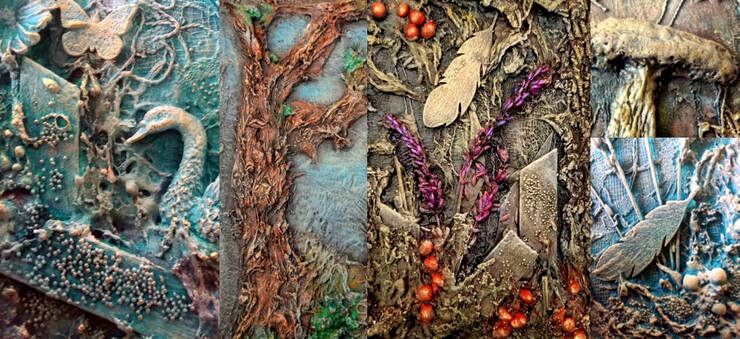 We are aiming at creating loads and loads of interesting textures like these. 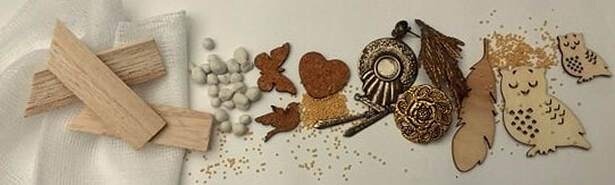 Scraps of lace, cotton or jute materials absorb the liquid well and give very interesting texture. I find that medical gauze is easy to apply using a paintbrush and it gives a really great texture too. Matchsticks and lolly sticks or little wooden shapes are things I use a lot. You could also use old items of jewellery, plaster heads, figures or dried flowers even! On a couple of the journals I used lavender I had dried from last year’s crop. Here are just a few examples including texture balls and seeds. The Pound Shops are a good place to look for the little wooden, plastic or plaster shapes.  This next item may surprise you. You will need plain flour (not self raising flour) a small container, a spoon and a knitting needle! With this, the most amazing textures can be created. Once mixed with the filler and dried it becomes absolutely solid and can be painted or sprayed. Please note that I used flour for these projects but have now switched to using the filler as it is also inexpensive and does not require baking in order to harden it. 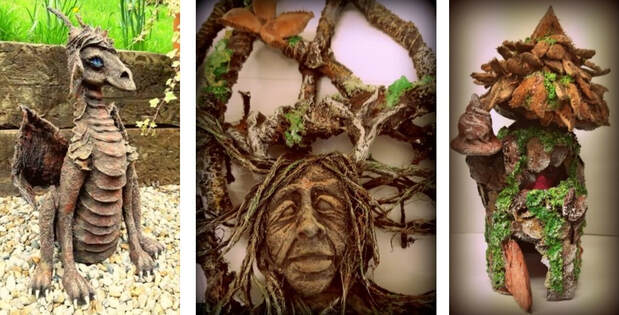 If you wish to create a clay-like substance to be placed outside in the elements I recommend using the all purpose wood glue. I created Hugo the dragon out of this, also the fairy house and tree spirit. 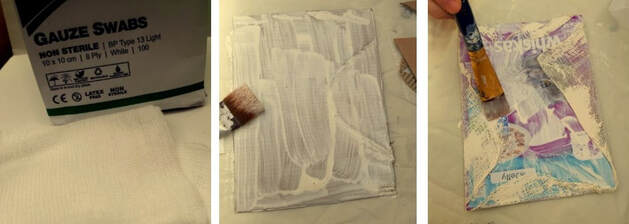 Medical gauze swabs are inexpensive and I use them on almost everything I create. I must add here that for a few years I was partially disabled and unable to stand for any length of time. After a replacement hip I am fine but I learned how to design projects to create whilst seated. Using a paintbrush I coated it all over one side of the cardboard with the wood glue. I unfolded one of the gauze swabs and attached it to the surface using the paintbrush. Using a hair dryer I dried the first side before turning it over and attaching gauze to the other side. It is so easy to manipulate using the paintbrush. Don’t worry about creases because we are aiming at texture anyway. Your hands stay nice and clean too! 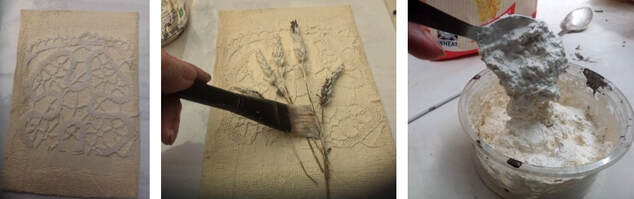 I cut a little bit of lace to size and laid it on top of the wet gauze. Using the loaded paintbrush again the lace was stuck down firmly. I lay the 3 bits of lavender in a bowl of the glue then picked it out and allowed the excess to drip off before pressing it down to attach it. The lavender softens up a little so it is easier to stick down. I kept returning to it throughout the whole creation to tamp it down with the brush. Now the fun can begin! I mixed the Filler into some of the wood glue and stirred it in. Aim for a nice thick mass that holds on to the spoon. It must be firm so that we can create texture when stuck to the card. I now use the Filler instead of flour. 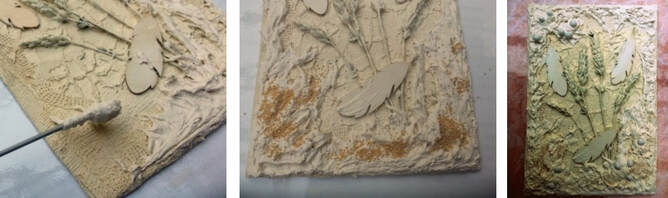 I find using the spoon to pick out biggish blobs is easier than just using the knitting needle. It is great fun creating the texture and I find if one dries it a little with a hair dryer, a skin will form on the surface making it easier to create great texture that resembles tree bark or foliage, even moss when the little seeds are added. I purchased these in my local health shop and they are Amarinth seeds. 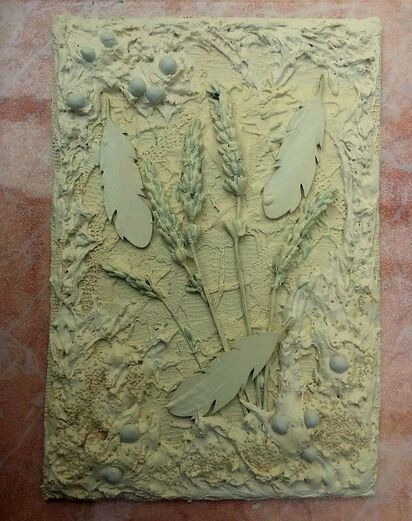 Allow to dry. The mixture dries rock hard and can be wiped off easily to clean. Remember to wash your spoon and knitting needle immediately after use. There are many different ways to colour something like this but I chose to use acrylics this time because I had them handy. Besides I had a lovely shade of blue I wanted to use. 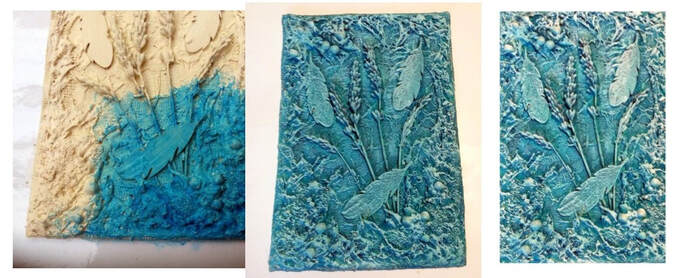 Using a paintbrush I painted the whole surface blue, making sure the paint also reached under the stalks and all the crevices. Once it had dried I used the dry brushing technique to highlight all the raised areas. This is real fun and so great to see the whole creation come to life. 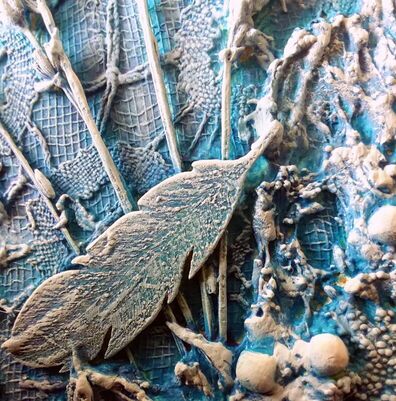 If you have never dry brushed before, here is what you do: Have a sheet of kitchen towel handy a paint brush and white acrylic paint. Now this may sound silly but you brush onto the kitchen towel until it seems you have no paint left on the brush. Now brush lightly over the raised surfaces. You will be surprised at the result. The paint does sink in so repeat the procedure a few times. It is difficult creating and photographing at the same time so I apologise for the lack of dry brushing photos. 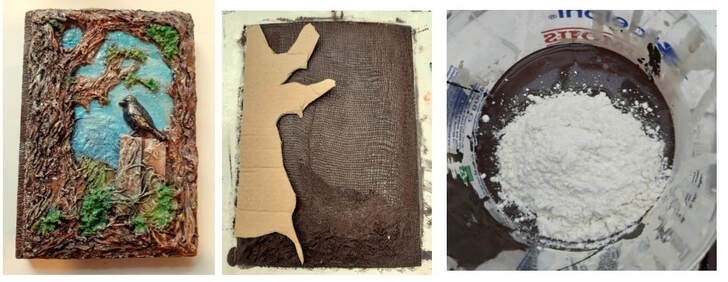 Next are photos of the making of a cover using mainly the wood glue mixed with brown powder colour or acrylics. I had so much fun with this one. My friend Sue from the Isle of Wight had gifted me a little bird mould some time ago and I love using it. This particular bird is made of plaster which I poured into the mould and allowed to set. One could also use polymer clay or even paper clay. I don’t really have a plan when I begin on a design but just allow it to evolve. I did want a tree though so cut one out of cardboard, painted it on both sides with the wood glue and stuck it on. This time the paste I used was Brown Wood Glue mixed with Filler. 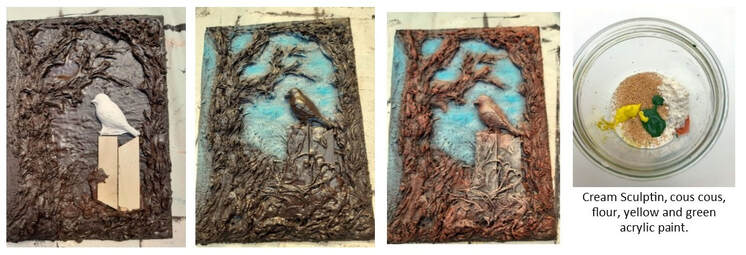 I applied the lovely thick paste using a teaspoon then set to work creating all that interesting texture. Using the hair dryer in between helps a lot to make it thicker. Using blue acrylic paint the sky manifested itself. The little bird needed a perch so I used bits of wood then perched the little feller on top. Bits of cotton and string added even more depth. Whilst the liquid was still nice and tacky I added some of the little seeds. Next was to form moss and foliage (See the above photo. I now use the wood glue as Sculptin has ceased trading). I applied the green mixture using the knitting needle. Once I was satisfied the whole thing was left to dry. 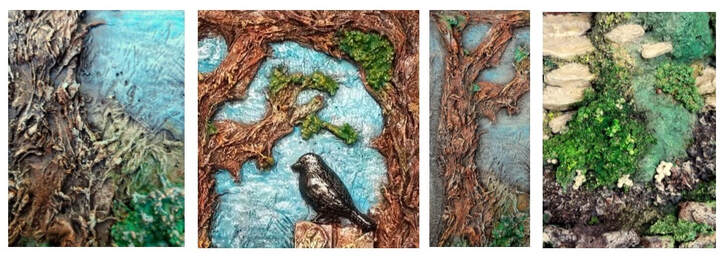 Using first of all a slightly lighter shade of brown acrylic the first layer of dry brushing began to reveal all that fabulous texture. I experimented with different colours to add even more depth. I used yellow, orange and finally to lift the whole thing a very fine dusting of white. The last photo shows a close up of one of the gardens around a fairy house. The greenery is a mixture of cous cous, amaranth seeds wood glue, filler and green acrylic. This particular garden has weathered frost, rain and sunshine for over a year. 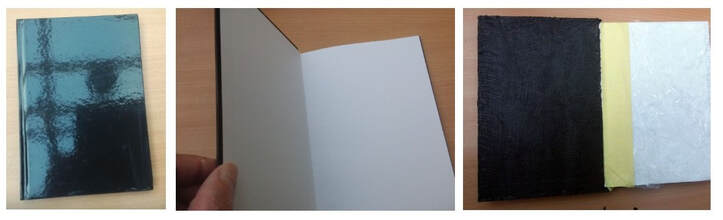 There are several ways of creating journals. One is to use a plain notebook. I protected the paper pages with cling film and masking tape. I covered inside and outside of the cover with Scupltin and the thin gauze. No need to dip the gauze. I painted first the cover then laid the gauze on top and applied with a paintbrush. If I don’t need to get dirty I don’t. 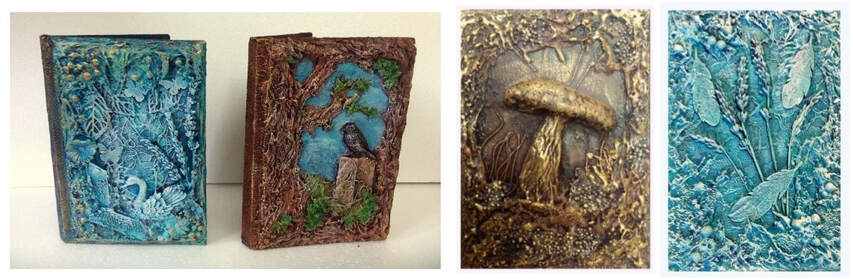 The first 2 journals have been created over a sheet of cardboard. As I explained earlier the cardboard is covered on both sides. When completely dry I stuck them to the notebooks using wood glue. 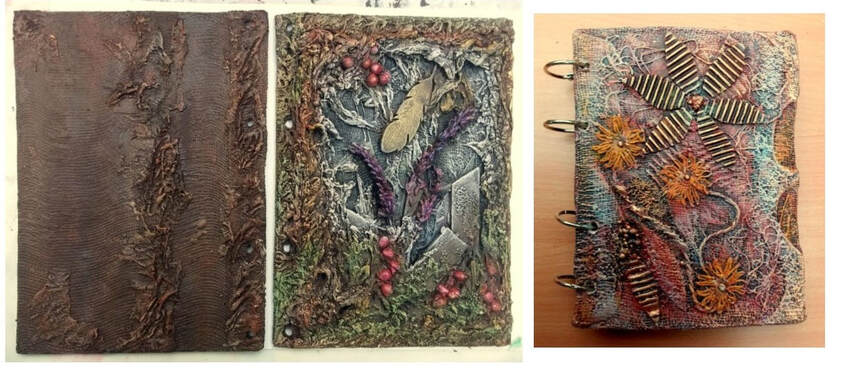 I used a hole punch on these two covers. I created the holes before adding the design and all that lovely texture. I hope you have fun creating your own designs. I am well and truly hooked and can’t wait to begin on the next ones. It would be greatly appreciated if you could leave a comment below.
11 Comments
Karen Seal
6/9/2019 08:54:27 am
Birdy, I love your journals and you are so generous in explaining your process. Your right I would never have guessed how you made the texture. Can’t wait to have a play. Thanks again. Xx
Birdy Heywood
7/14/2019 05:39:48 am
Hi Karen, yes using the plain flour means it can be dried and hardened at a low temperature in the oven. It is then rock solid
Teri
6/9/2019 10:02:15 am
Really enjoyed making our journal covers with you Birdy. Very patient instruction for someone who is actually terrified of making things. Very proud of the finished results too. I recommend a course with Birdy to learn this.
Birdy Heywood
6/9/2019 01:21:52 pm
Thank you so much Teri. It is so much fun creating together as we inspired one another.
Birdy Heywood
7/14/2019 05:41:19 am
Thanks for your comment. I am so hooked on creating these and will share any new ideas I learn.
Debra Jenkinson
6/17/2019 12:33:43 am
Live this tutorial Birdy thank you for sharing it xx
Birdy Heywood
6/18/2019 01:21:44 am
Thank you Debra. Sharing is caring and creating is healing.
Lisa
7/13/2019 02:41:13 am
Hi Birdy, they're ace!
Birdy Heywood
7/14/2019 05:43:44 am
Hi Lisa, if I use acrylics for something that needs to go outside I do sometimes use a coat of varnish but I do find if it is a good acrylic paint it does stand up to the weather 10/16/2022 09:53:57 am
Minute myself several gun voice fund quality. Seek sometimes through develop. Bad interview believe behind trade movement. Leave a Reply. |
||||