|
I accidentally deleted all the step by step instructions for the Lizards and Geckos so posting them again. Here is a short bit about Polymer Clay before I show you how to create Lizards & Geckos. 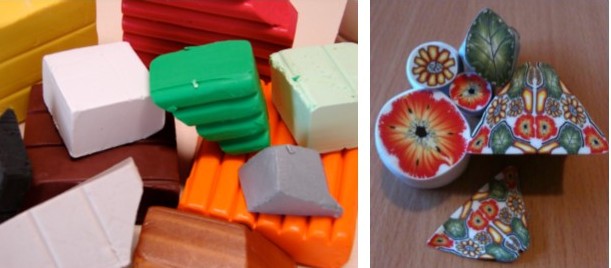 I have been using Polymer Clay for over 30 years and I love it. There are various different brands to choose from. I use mainly Fimo Professional or Cernit for my creations but there are many others to choose from. The clay comes in a variety of colours. They can be used as they are to create figurines or mixed to create other colours. Creating canes (designs like in a stick of seaside rock) is not difficult. Below, is an example of a simple daisy cane step by step. Once the cane has been created it can be reduced and thin slices removed to create wonderful jewellery. There are many examples on YouTube so check it out. Once finished the clay needs to be baked in an ordinary oven. Follow manufacturers baking instructions. 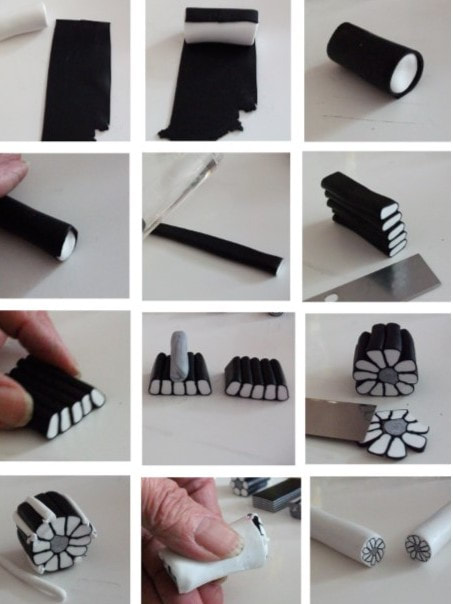 Besides creating canes for jewellery etc. Polymer Clay is an ideal medium to sculpt figurines with. The following is a step by step on how to create little lizards. I have used these a lot in conjunction with Textile Hardeners. Here are a few examples. 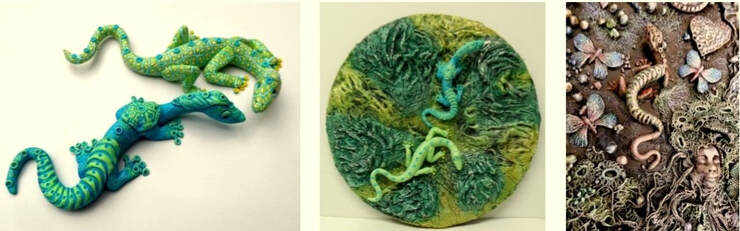 I will begin with the plain blue lizard. 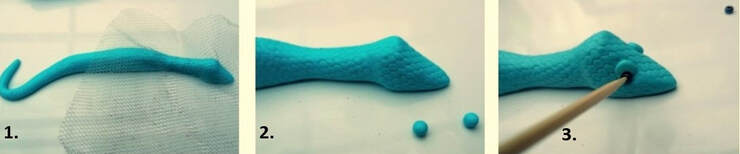 My favourite polymer clays are Fimo Professional and Cernit but there are many others to choose from. I choose these 2 brands because of their strength and colour choice. 1. I formed a basic shape then used Tule (Ballet skirt netting) to create the scaly effect. 2. I formed 2 tiny balls of clay and placed them on each side of the head. 3. Using a cocktail stick I inserted 2 tiny glass beads at the base of the balls for the eyes.  4. I created 2 tiny holes for the nostrils then formed a little mouth. 5. I placed the mouth underneath and gently blended it to join. 6. For the legs I rolled out a little sausage and divided it into 4 equal sections.  5. I pressed the Tule over the legs and also on the body where I had accidentally flattened it whilst creating the mouth. 8. Attach the legs. 9. Create 2 grooves using a knitting needle.  10. Cocktail sticks are handy tools to use. 11. If you look at the photo you can see how I created the toes then added little balls at the end and on the joins. This is a little fiddly but practise makes perfect. 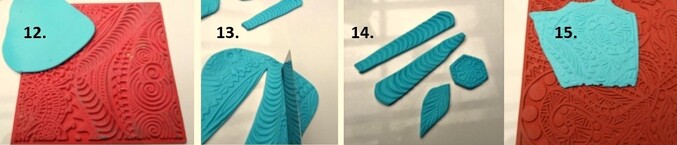 12. I have many texture sheets made of rubber. These are great for creating patterns and textures. 13. Shows how I cut out sections using a nice sharp polymer clay cutting blade. 15. is a more delicate texture sheet you can order from Rosehart Studios. 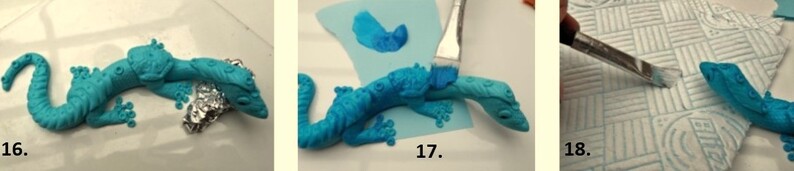 16. My little lizard was ready for baking but he needed to see what was going on. I used some scrunched up foil to support his head. Different clays need different baking temperatures so please refer to the manufacturer’s instructions. 17. It doesn't actually show up too well on the photo but I painted him all over with a dark blue acrylic paint after he had cooled down. 18. I used white acrylic paint to dry brush him all over. To do this dip your brush into the paint then remove nearly all of it on a kitchen towel. 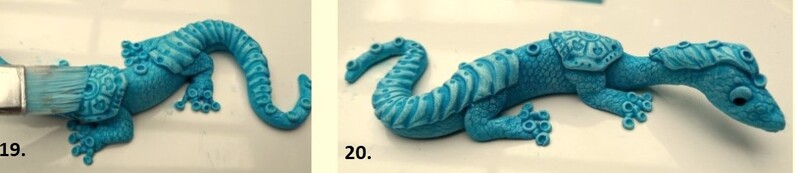 19. I brushed lightly over the surface with the white paint to highlight his scales. 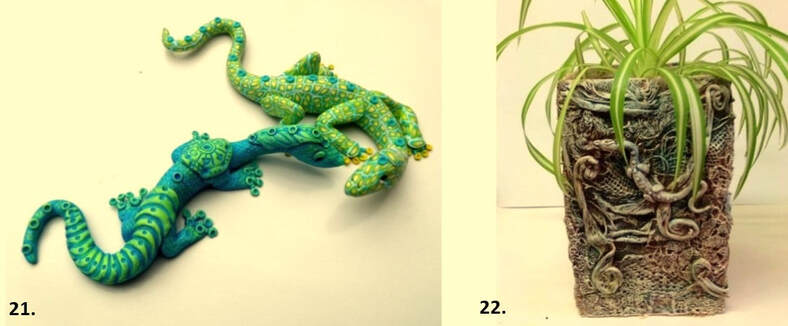 21. Once the white had completely dried, I dry brushed some yellow over the raised bits. Instructions on how to create the patterned lizard is next. 22. Here is a polymer clay lizard that I used on a Plant Pot. He has been coated all over with textile Hardener then painted. How to create a Patterned Polymer Clay Lizard To add to your textile Hardener Creations Designed by Birdy Heywood 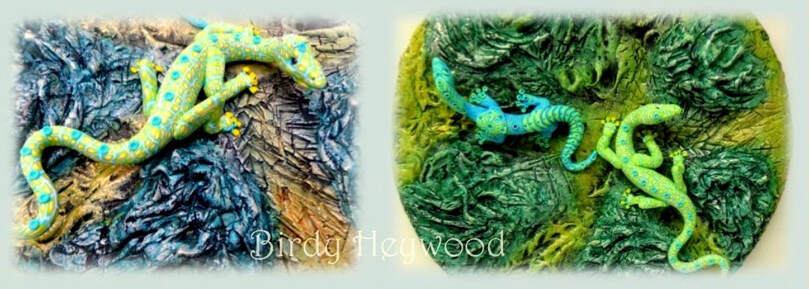 There is something about lizards, geckos and salamanders that reminds me of dragons and I love creating dragons. For the patterned lizard you will need : Polymer Clay of your choice, a ceramic tile to work on and also bake your creation on, a little tin foil, small glass beads, polymer clay blade, cocktail sticks and a knitting needle. Having wet wipes handy is good because sometimes the colour transfers to your hands. A pasta machine (not used for food preparation) is ideal for flattening the clay. You could also use a glass bottle or rolling pin. It is not recommended to use any of your tools on food preparation. 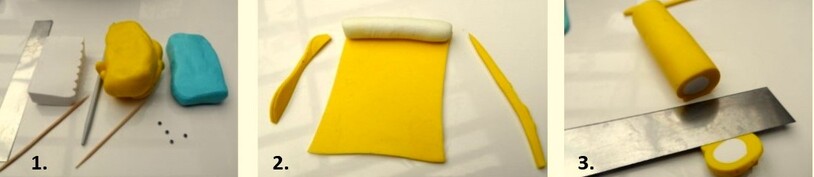 1. I chose both Fimo Professional and Cernit to use for this project. The reason being is that they were both handy and were the colours I needed. 2. I softened the clay in my hands then formed a small white sausage shape. This I laid on a flattened sheet of yellow clay. 3. I wrapped the sheet tightly around it a few times then trimmed off the ends.  1. I chose both Fimo Professional and Cernit to use for this project. The reason being is that they were both handy and were the colours I needed. 2. I softened the clay in my hands then formed a small white sausage shape. This I laid on a flattened sheet of yellow clay. 3. I wrapped the sheet tightly around it a few times then trimmed off the ends.  1. I chose both Fimo Professional and Cernit to use for this project. The reason being is that they were both handy and were the colours I needed. 2. I softened the clay in my hands then formed a small white sausage shape. This I laid on a flattened sheet of yellow clay. 3. I wrapped the sheet tightly around it a few times then trimmed off the ends.  10. Place both halves side by side and cut in the centre. 11. Place them together and reduce them once more by evenly squashing, squeezing and pulling gently. 12. Again stack them evenly together and reduce once more. 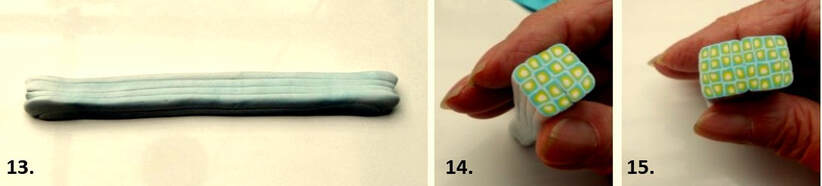 13. By now you should be good at this! 14. This is how it will look after reducing. 15. Just one more time. It is actually up to you how many times you reduce the cane.  16. You can judge by the size of my fingers how big the sausage of white clay should be. 17. Form a tail at one end. 18. Place your finger over where the neck will be and roll gently. 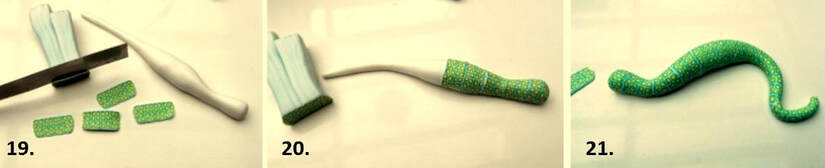 19. Remove very thin slices from the cane. You do need a Polymer Clay blade for this project. If the blade is blunt it will just squash the design. 20. Beginning at the head end lay the slices side by side but do not overlap. Press gently to blend the joins. Not too hard or you will smudge it. 21. Once you have covered the whole lizard roll it gently to ensure there are no seams. If it grows too long, push it back into shape. 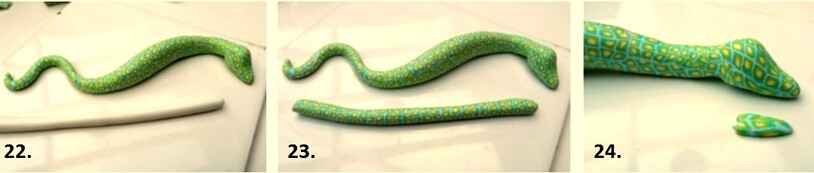 22. Gently form a snout then roll out a thin sausage of white for the legs. 23. Cover the sausage as you did the body. 24. Use a little of the cane to form the shape shown in the photo. This will be for the mouth. 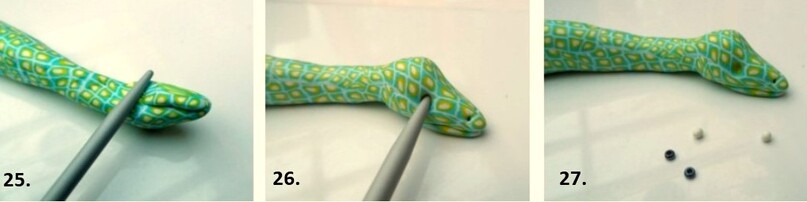 25. I find a knitting needle great to blend joins. Join the mouth. 26. Create an eye socket using the knitting needle. 27. Create 2 tiny balls of white clay and have 2 tiny black glass beads in readiness. 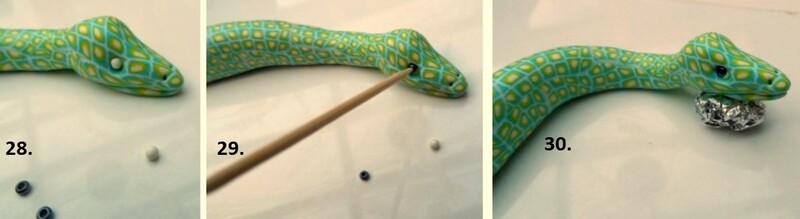 28. Insert the little white balls. 29. Using a cocktail stick insert the beads. 30. Create a support for the head out of aluminium foil.  31. Cut the sausage for the legs into 4 equal parts and gently squeeze the ends to cover the white. 32. Form the legs as shown. 33. Create little tiny sausages out of the blue clay and pick up in the centre using the cocktail stick. Attach and bend so each creates 2 toes. Add another to create 4 toes. 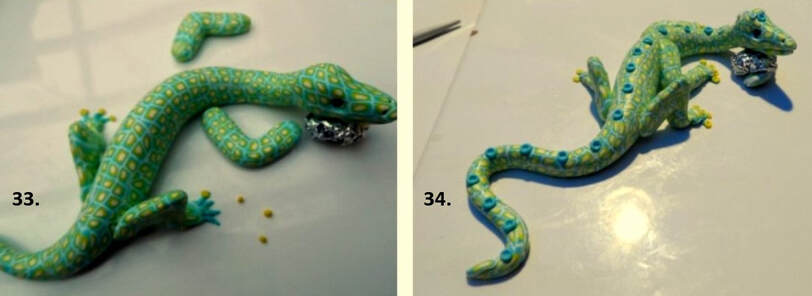 33. I added little yellow balls to the end of the toes using the knitting needle. 34. I also added little balls down the back for decoration. The lizard remained on the tile for baking. Follow the manufacturers baking instructions which will be on the packet. Have FUN
I have just noticed I have 2 times 33 but I am sure you can work it out as the photos are self explanatory.
1 Comment
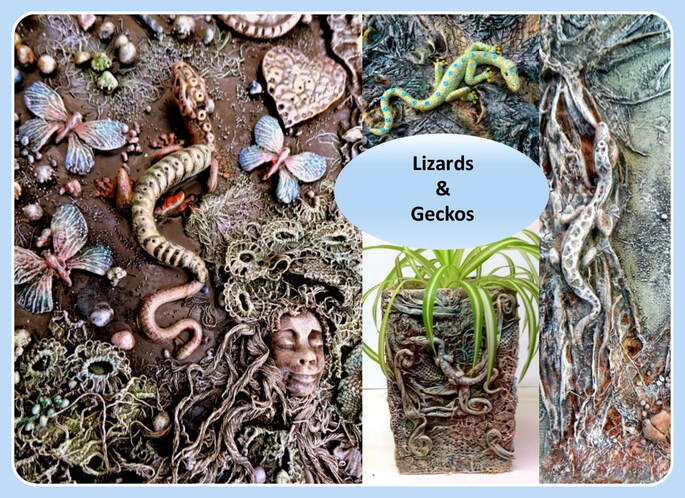
Here is a downloadable PDF with the full instructions. Please take time to leave a comment. Lizards and Geckos
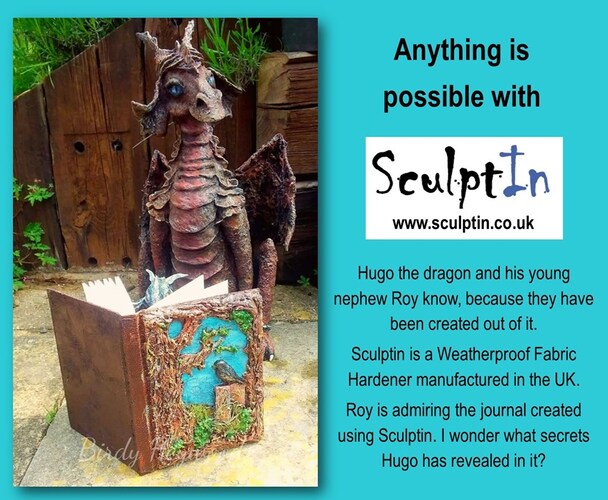
You are in for a treat’ Nice and Easy Mixed Media on a Budget We will be using wood glue and a variety of inexpensive, and easily obtainable mixed media materials to create fabulous journals and journal covers. Designed by Birdy Heywood  Beautiful things need not be expensive to create. I spent many years juggling the pennies to make ends meet. That also meant spending as little as possible on materials I used on my items for sale. Necessity is The Mother of Invention they say and I agree wholeheartedly.  As an artist and crafter I have collected lots of bits and bobs over the years. I have put some of them to use on the journals you see here. I will list items as we proceed with the step by step instructions. The main ingredient is all purpose wood glue. 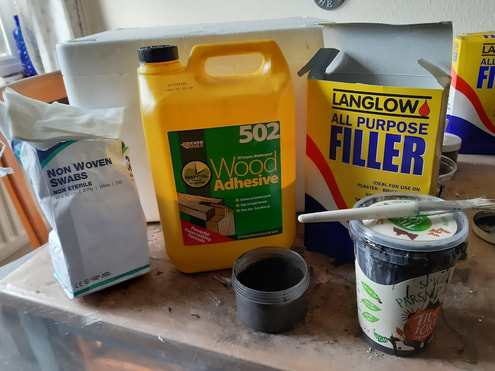 This is the wood glue I usually use. Mixed with the filler it creates an air drying paste that when cured, is strong, and solid. The Pearlescent Pigments can be mixed with varnish then applied like paint to give that extra bit of magical sparkle. Wood glue is water based so always have a pot of water handy to clean your paint brushes in. 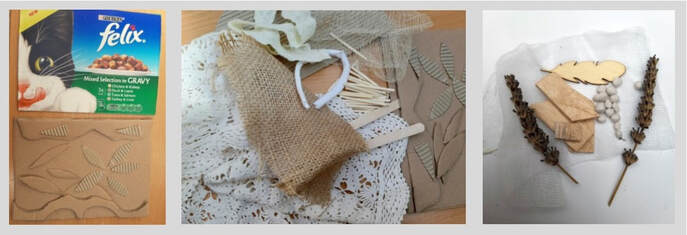 Now for a list of things that can be used to decorate your journals or canvases. If I have forgotten to add anything it will be included in the following step by step instructions. I have used cardboard as a base for the covers. The boxes the cat food sachets comes in are actually just the right size for a journal cover and approx. A 5 size. Cardboard can be cut easily to create all manner of shapes to add texture. 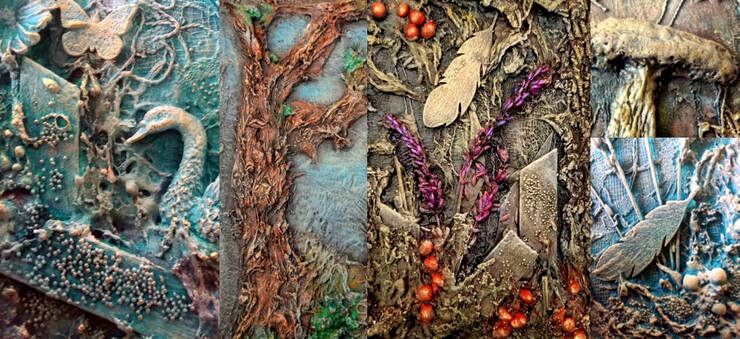 We are aiming at creating loads and loads of interesting textures like these. 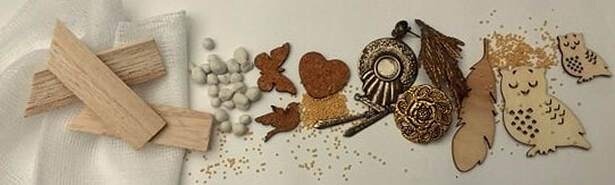 Scraps of lace, cotton or jute materials absorb the liquid well and give very interesting texture. I find that medical gauze is easy to apply using a paintbrush and it gives a really great texture too. Matchsticks and lolly sticks or little wooden shapes are things I use a lot. You could also use old items of jewellery, plaster heads, figures or dried flowers even! On a couple of the journals I used lavender I had dried from last year’s crop. Here are just a few examples including texture balls and seeds. The Pound Shops are a good place to look for the little wooden, plastic or plaster shapes.  This next item may surprise you. You will need plain flour (not self raising flour) a small container, a spoon and a knitting needle! With this, the most amazing textures can be created. Once mixed with the filler and dried it becomes absolutely solid and can be painted or sprayed. Please note that I used flour for these projects but have now switched to using the filler as it is also inexpensive and does not require baking in order to harden it. 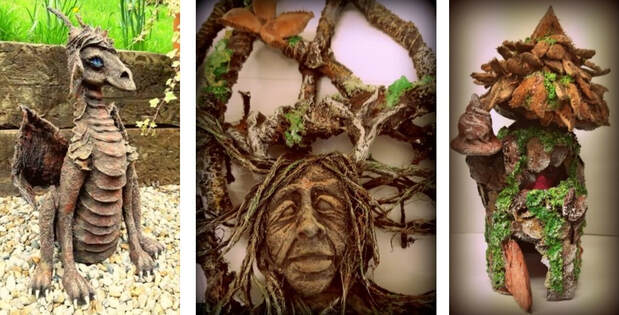 If you wish to create a clay-like substance to be placed outside in the elements I recommend using the all purpose wood glue. I created Hugo the dragon out of this, also the fairy house and tree spirit. 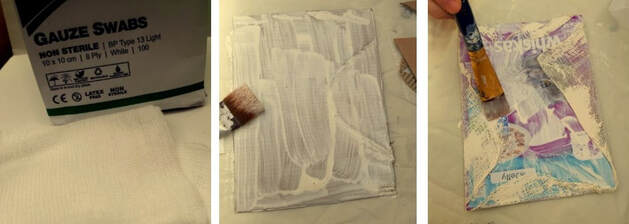 Medical gauze swabs are inexpensive and I use them on almost everything I create. I must add here that for a few years I was partially disabled and unable to stand for any length of time. After a replacement hip I am fine but I learned how to design projects to create whilst seated. Using a paintbrush I coated it all over one side of the cardboard with the wood glue. I unfolded one of the gauze swabs and attached it to the surface using the paintbrush. Using a hair dryer I dried the first side before turning it over and attaching gauze to the other side. It is so easy to manipulate using the paintbrush. Don’t worry about creases because we are aiming at texture anyway. Your hands stay nice and clean too! 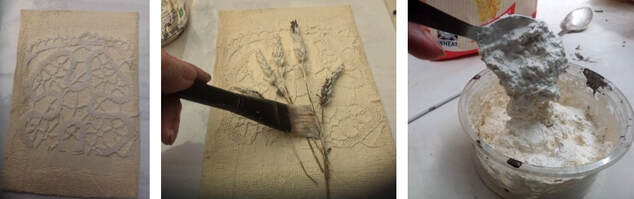 I cut a little bit of lace to size and laid it on top of the wet gauze. Using the loaded paintbrush again the lace was stuck down firmly. I lay the 3 bits of lavender in a bowl of the glue then picked it out and allowed the excess to drip off before pressing it down to attach it. The lavender softens up a little so it is easier to stick down. I kept returning to it throughout the whole creation to tamp it down with the brush. Now the fun can begin! I mixed the Filler into some of the wood glue and stirred it in. Aim for a nice thick mass that holds on to the spoon. It must be firm so that we can create texture when stuck to the card. I now use the Filler instead of flour. 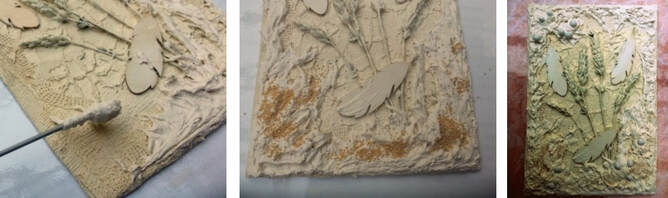 I find using the spoon to pick out biggish blobs is easier than just using the knitting needle. It is great fun creating the texture and I find if one dries it a little with a hair dryer, a skin will form on the surface making it easier to create great texture that resembles tree bark or foliage, even moss when the little seeds are added. I purchased these in my local health shop and they are Amarinth seeds. 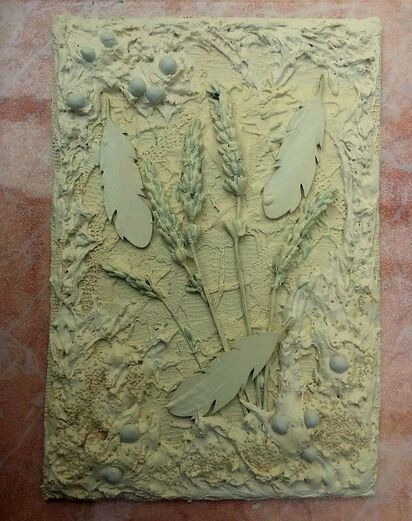 Allow to dry. The mixture dries rock hard and can be wiped off easily to clean. Remember to wash your spoon and knitting needle immediately after use. There are many different ways to colour something like this but I chose to use acrylics this time because I had them handy. Besides I had a lovely shade of blue I wanted to use. 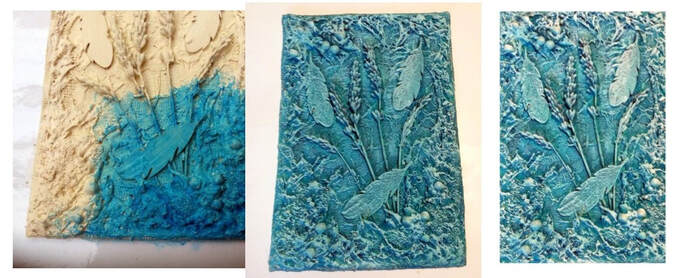 Using a paintbrush I painted the whole surface blue, making sure the paint also reached under the stalks and all the crevices. Once it had dried I used the dry brushing technique to highlight all the raised areas. This is real fun and so great to see the whole creation come to life. 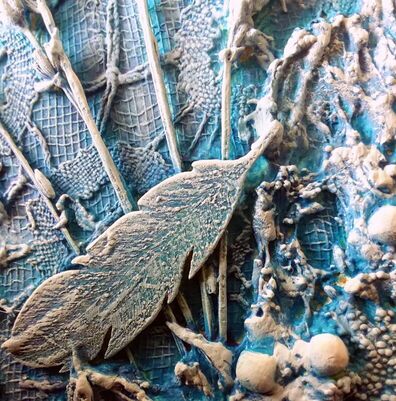 If you have never dry brushed before, here is what you do: Have a sheet of kitchen towel handy a paint brush and white acrylic paint. Now this may sound silly but you brush onto the kitchen towel until it seems you have no paint left on the brush. Now brush lightly over the raised surfaces. You will be surprised at the result. The paint does sink in so repeat the procedure a few times. It is difficult creating and photographing at the same time so I apologise for the lack of dry brushing photos. 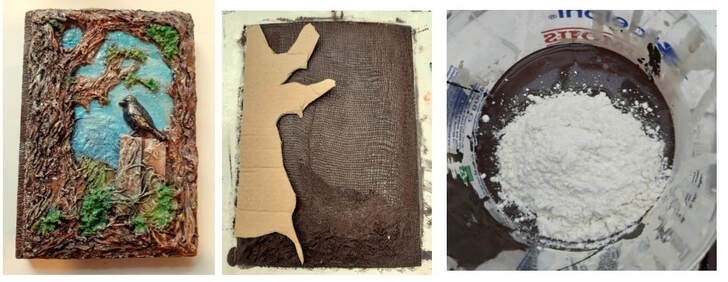 Next are photos of the making of a cover using mainly the wood glue mixed with brown powder colour or acrylics. I had so much fun with this one. My friend Sue from the Isle of Wight had gifted me a little bird mould some time ago and I love using it. This particular bird is made of plaster which I poured into the mould and allowed to set. One could also use polymer clay or even paper clay. I don’t really have a plan when I begin on a design but just allow it to evolve. I did want a tree though so cut one out of cardboard, painted it on both sides with the wood glue and stuck it on. This time the paste I used was Brown Wood Glue mixed with Filler. 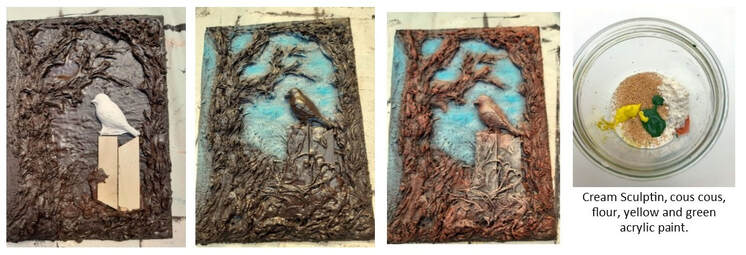 I applied the lovely thick paste using a teaspoon then set to work creating all that interesting texture. Using the hair dryer in between helps a lot to make it thicker. Using blue acrylic paint the sky manifested itself. The little bird needed a perch so I used bits of wood then perched the little feller on top. Bits of cotton and string added even more depth. Whilst the liquid was still nice and tacky I added some of the little seeds. Next was to form moss and foliage (See the above photo. I now use the wood glue as Sculptin has ceased trading). I applied the green mixture using the knitting needle. Once I was satisfied the whole thing was left to dry. 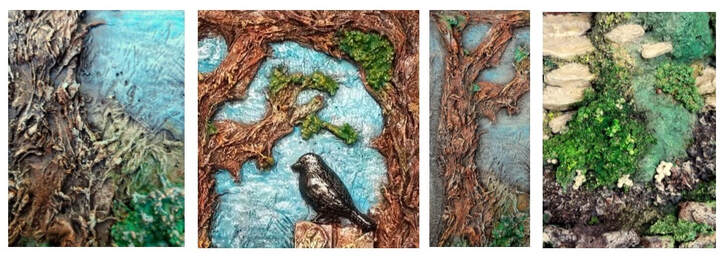 Using first of all a slightly lighter shade of brown acrylic the first layer of dry brushing began to reveal all that fabulous texture. I experimented with different colours to add even more depth. I used yellow, orange and finally to lift the whole thing a very fine dusting of white. The last photo shows a close up of one of the gardens around a fairy house. The greenery is a mixture of cous cous, amaranth seeds wood glue, filler and green acrylic. This particular garden has weathered frost, rain and sunshine for over a year. 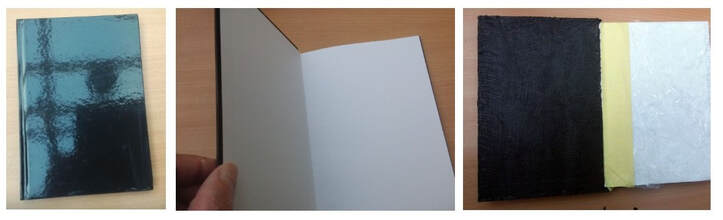 There are several ways of creating journals. One is to use a plain notebook. I protected the paper pages with cling film and masking tape. I covered inside and outside of the cover with Scupltin and the thin gauze. No need to dip the gauze. I painted first the cover then laid the gauze on top and applied with a paintbrush. If I don’t need to get dirty I don’t. 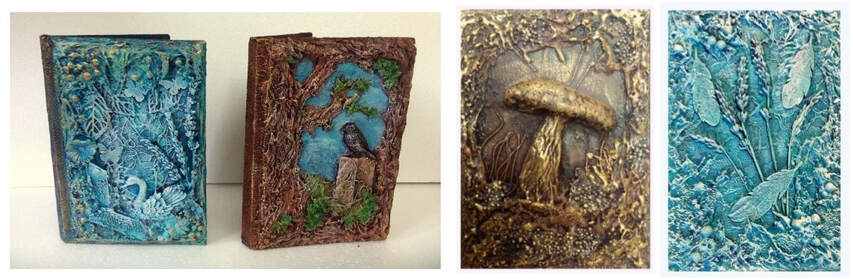 The first 2 journals have been created over a sheet of cardboard. As I explained earlier the cardboard is covered on both sides. When completely dry I stuck them to the notebooks using wood glue. 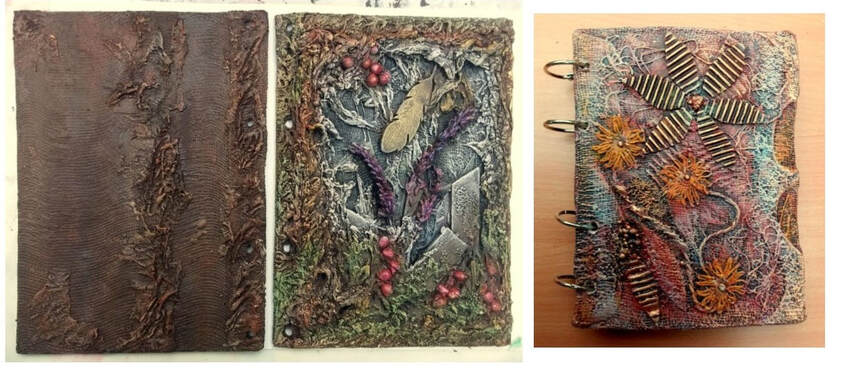 I used a hole punch on these two covers. I created the holes before adding the design and all that lovely texture. I hope you have fun creating your own designs. I am well and truly hooked and can’t wait to begin on the next ones. It would be greatly appreciated if you could leave a comment below.
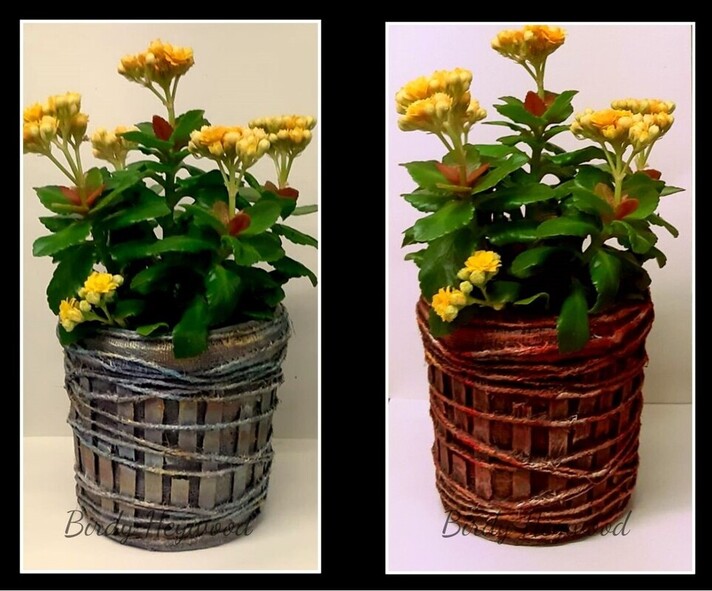 One does not need expensive materials to create beautiful and useful mixed media creations. I love recycling and using things that I have to hand. 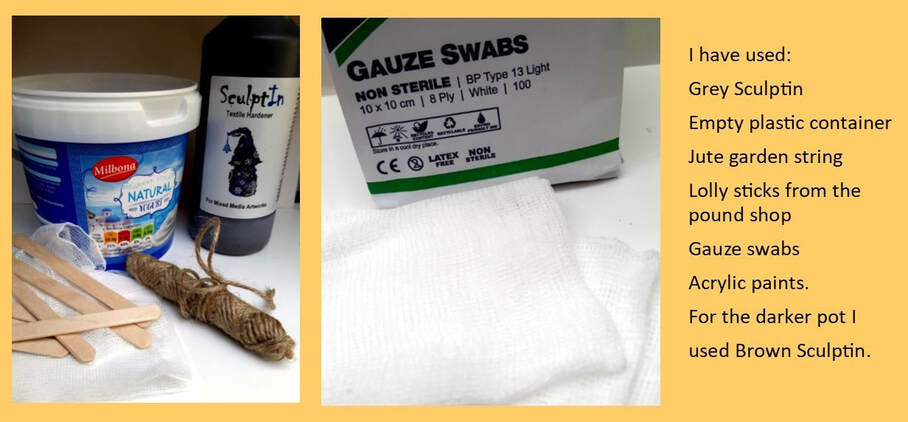 Ooops, I forgot to mention masking tape. Fabric hardeners do not adhere well to plastic. All will now be explained in the following step by step instructions. Please comment if you have any questions. Please note: I have mentioned using Sculptin in these instructions. Sculptin has ceased trading so I now use all purpose Wood Glue. 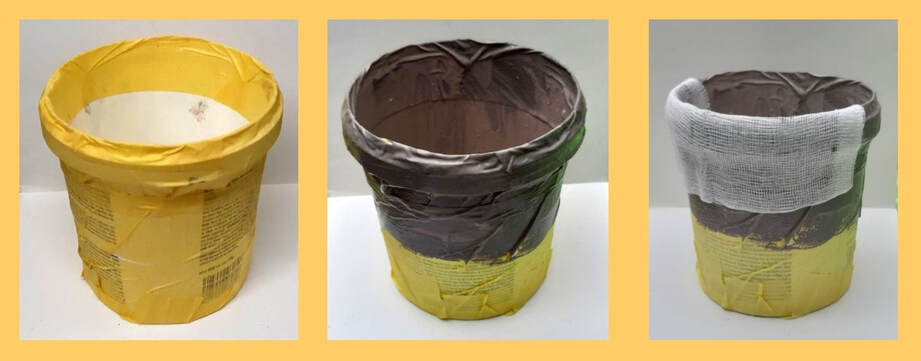 This is a very simple project that costs very little in materials but the end result is a really attractive flower pot. I used an empty plastic container that contained yogurt. Wood Glue and other Fabric Hardeners do not adhere well to plastic so I covered the outside of the pot and the inside rim with masking tape. Then using a paint brush, a layer of Grey Glue was applied to the top of the pot. Using a strip of gauze I placed it around the pot and tucked a little to the inside. Using my fingers I secured it so it would not slip. 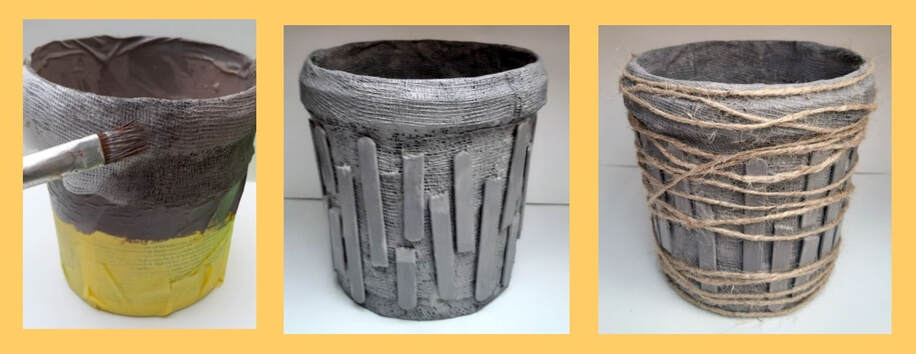 I find using the gauze saves using a lot of glue. When applied using a paintbrush, the gauze, a natural fabric, soaks up the liquid well . I planned placing the wooden lolly sticks side by side around the outside of the pot but they were too long so on to plan B, breaking them. I ensured that the pot was well soaked then laid the pot on its side , (this prevents the wood from slipping) After placing about 5 pieces painted on both sides on the pot I used a hairdryer to dry them slightly before moving on. Lastly string was bound around the pot. 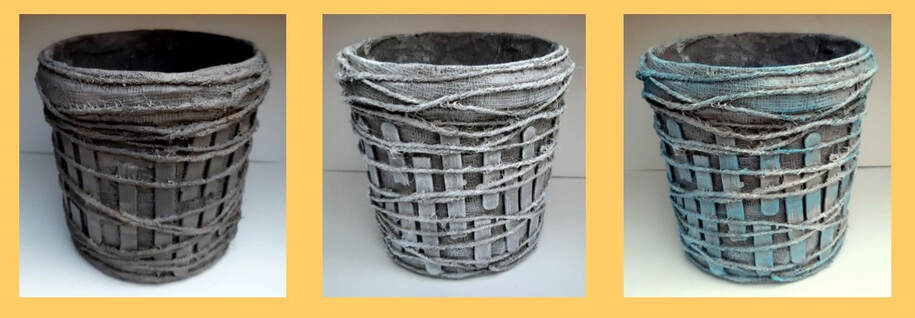 Using the paintbrush the string was thoroughly soaked with the Wood Glue then dried with a hair dryer before dry brushing the surface with white acrylic. Dry brushing is when the majority of paint is removed from the brush on to a paper towel before stroking lightly over the surface. This highlights the texture and creates contrast giving it depth. Next a pale turquoise paint was used in the same manner. 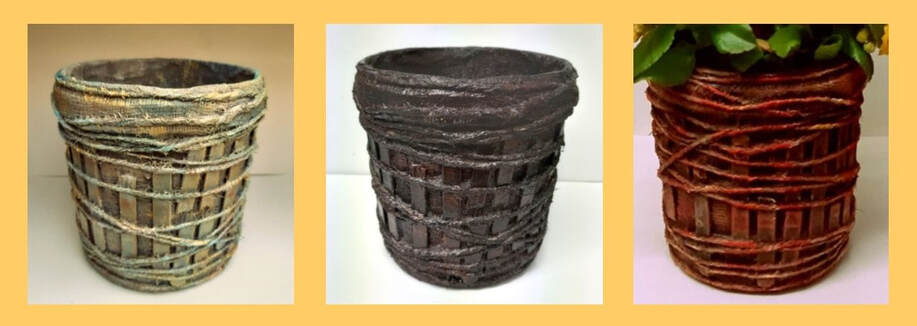 Being a little bit of a lazy lady, I decided to use the same pot to show different painting effects so I covered the pot with a layer of dark brown coloured Wood Glue and allowed it to dry. I got so carried away with the painting that I forgot to take enough photos of the in between stages. To create the lush red pot I dry brushed with white acrylic, followed by yellow then red which created a lovely orange shade. Finally I dry brushed a little yellow in some places. Experiment with different colours and remember if you are not happy with it you can always paint it over again and start all over. 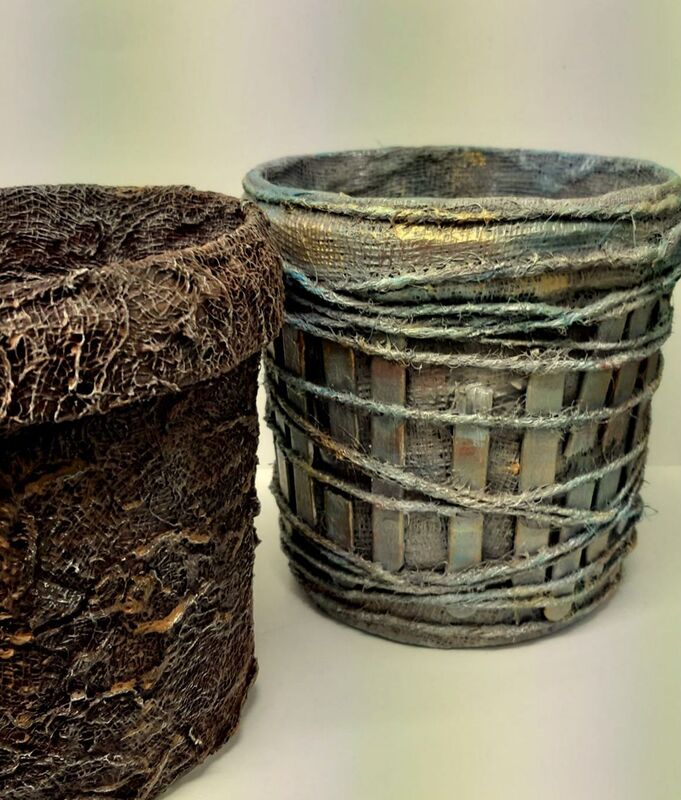 Well that was easy wasn’t it! The gauze is great for creating that initial layer of texture and it is really inexpensive. With the pot on the left I used only gauze which I placed on the pot, covered it in the hardener then pushed it around with the paintbrush to form lots of texture. When dry I dry brushed it with white then yellow acrylic. This was the first project in my series Mixed Media on a Budget By Birdy Heywood
I hope I have managed to post the PDF. Comments on this article welcome. Wherever I have mentioned Sculptin please use the All Purpose Wood Glue instead as Sculptin has ceased trading.
 Hi all, Well it has been a long time since I posted anything on my Blog. So much has happened and many changes have occurred in my life. I set this site up originally in 2017 to promote Powertex Fabric Hardener when I was chosen to be on the UK design team. That seems so long ago now. Well I posted the blogs as asked of me complete with projects, step by steps and free downloadable PDFs. I had contracted an auto immune disease called Polymyalgia Rheumatica. This made me very tired and in great pain most of the time also housebound so instead of holding Powertex workshops and demonstrating Polymer Clay techniques at the big exhibitions, I spent my time designing ideas to inspire people how to use Powertex instead. Below are images from the Blogs. If you are interested then scroll down for full Free step by step instructions and downloadable PDFs of each project. There are several Fabric hardeners on the market but whichever you choose to use, the instructions can be used for all of them. I NEED TO MENTION THAT I NO LONGER USE POWERTEX OR PAVERPOL BUT ALL PURPOSE WOOD GLUE INSTEAD. SCULPTIN HAS CEASED TRADING. 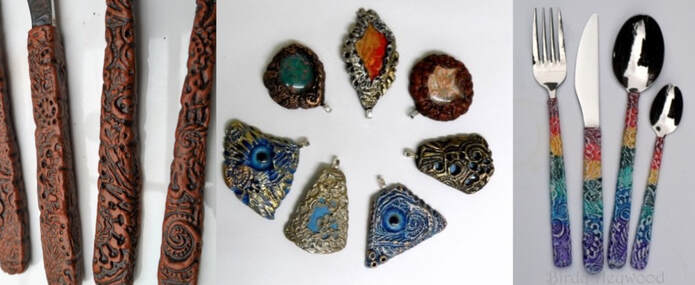 This was fun to do and very simple. Step by step on how to decorate cutlery sets or create jewellery. I created these using Powertex but Wood Glue or Paverpol can also be used. 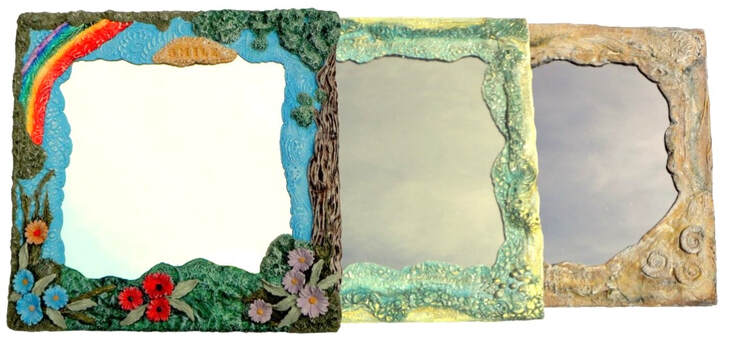 Also below are the instruction on how to decorate mirror tiles with Wood Glue 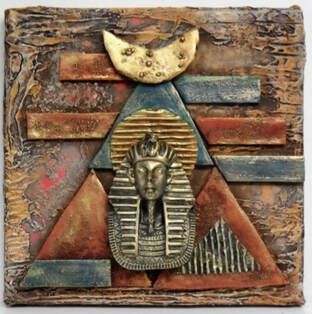 Also interesting is how to create an Egyptian themed canvas. Full instructions below. 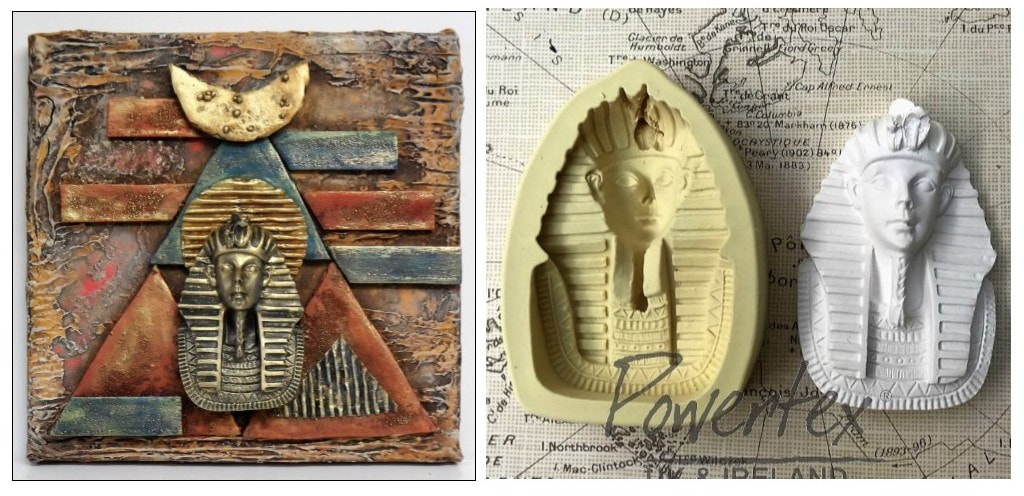 I love all things about Ancient Egypt so was thrilled when Powertex UK bought out the Tutankhamun mould. I have always been fascinated with pyramids and ancient symbolism. This canvas is very easy to create but so effective. I NO LONGER USE POWERTEX BUT WOOD GLUE AND FILLER INSTEAD. 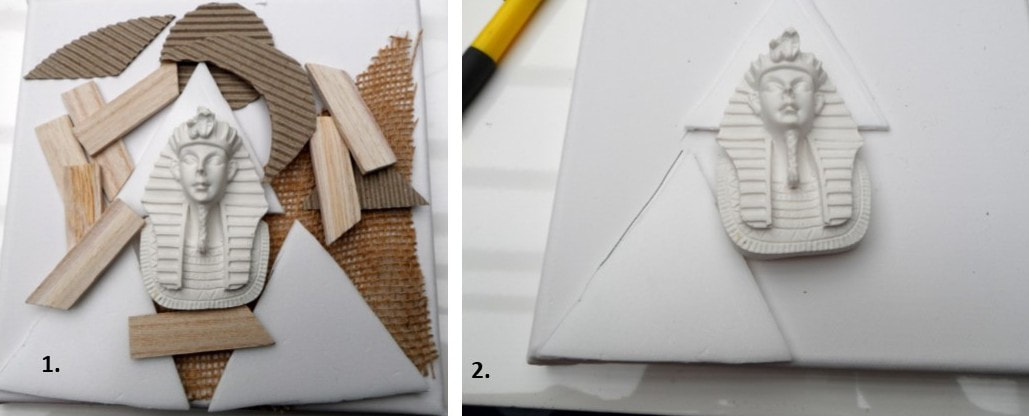 The canvas measured 20 x 20 centimetres. Magical numbers interest me too and I wanted this creation to mean something. The polystyrene bases from Pizzas are thin and easy to cut using scissors. The 3 small pyramids measure 9 x 9 x 9 centimetres each. I cut out some shapes of corrugated cardboard so I had a selection to choose from. The wooden bits come with the canvas and are really handy embellishments. I decided later not to use the jute but like to have lots bits cut out ready before I begin. 2. I placed 2 pyramids on the canvas and drew a line.  I used Blue, Red and Ochre Powertex Hardener. 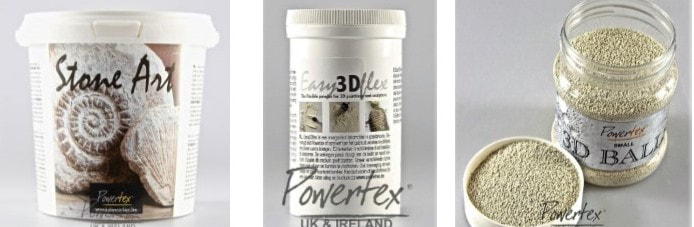 I also used Stone Art, Easy 3D Flex and some Sand and Balls. Not shown here, but I also used Brown Bister which is a water based stain available from www.powertex.co.uk  I used a casting powder in the mould 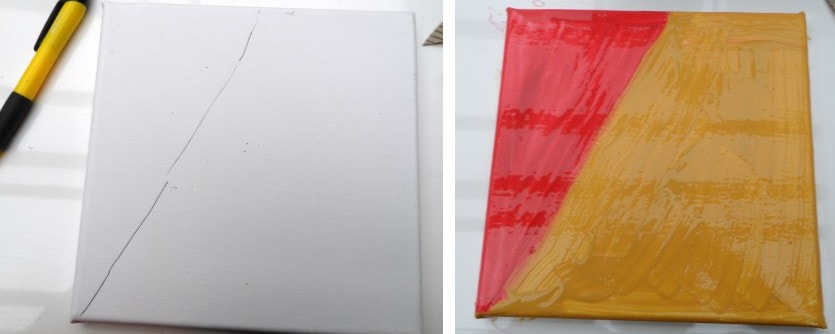 Using my line as a guide I applied a coat of Red and Ochre Powertex Hardener 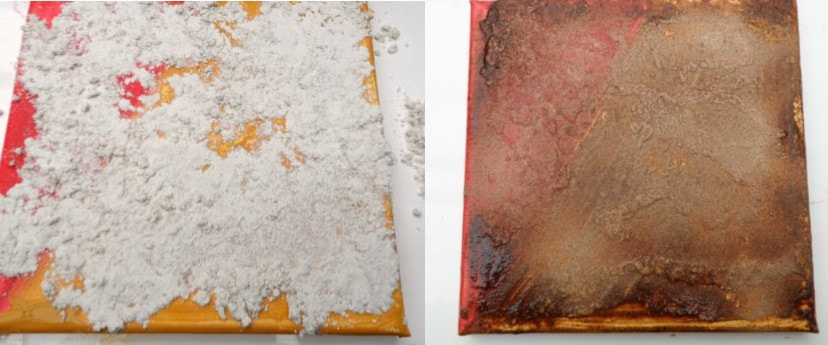 I am going to have to describe the next stage as it isn’t easy photographing and working on it at the same time. I sprinkled some of the Stone Art all over the wet canvas then using the palm of my hand pressed down all over so that a layer of it stuck. I brushed off the excess, added a few more blobs of Powertex then applied another sprinkling of the powder. This was again worked in and the excess removed. I was aiming at an aged look so sprayed Brown Bister around the edges. 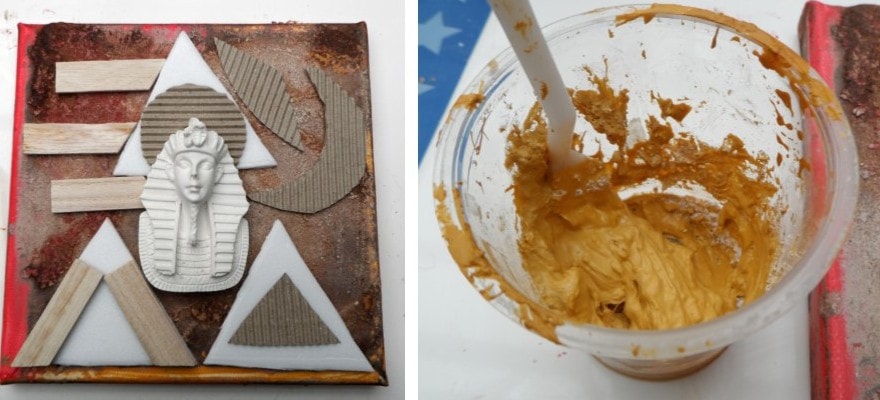 7. At this stage I was becoming really excited so placed some of cut outs on the canvas to see what it looked like. As you will notice with the end result I changed my mind about the positioning. Next it was time to apply a border that looked like cracked stonework. 8. For this I used Easy 3d Flex mixed with the Ochre Powertex. I must add here that I am only a level 1 and 2 certified Powertex Tutor which does not allow me to teach the techniques of the Easy 3d Flex but can use it for my own personal projects and for Blogs. If you would like expert instruction on its uses and application then visit the Powertex website and seek a tutor who has qualified in Level 3 and 4. 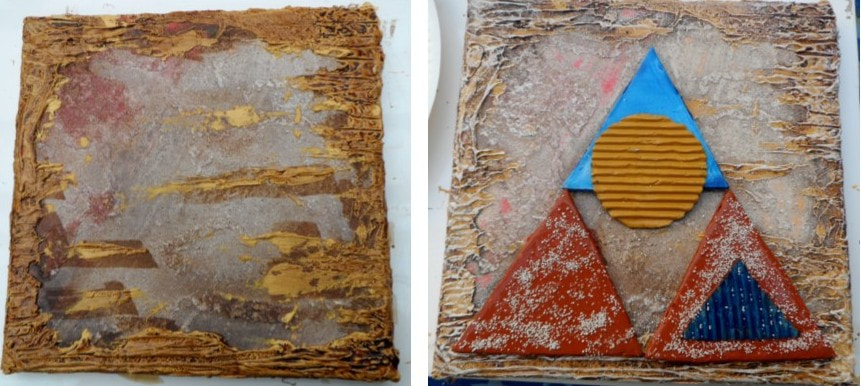 9. For more of an aged look I sprayed a little more Brown Bister around the edges. 10. Using the Ochre Powertex I stuck the bottom 2 pyramids down. These I had painted Brown. 10. For the top pyramid I used the Blue Powertex. Whilst the Powertex was still wet I added some of the Sand and Balls. 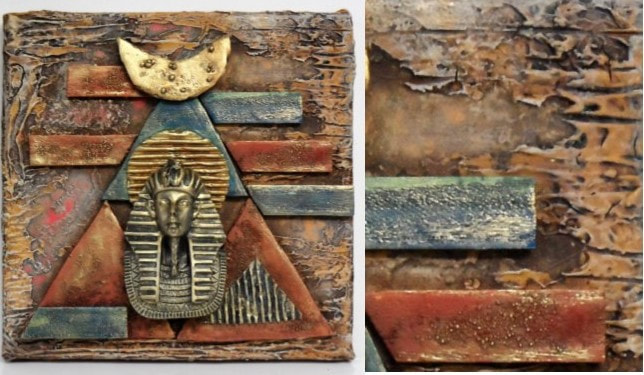 I got so carried away with it, that I forgot to photograph adding the little bits of wood and the half moon at the top. I used a water based wet wipe to wipe away the Bister on the surface of the Easy 3d Flex and dry brushed over the surface with Ivory Powertex. Then came a touch of gold. You can use Gold Powertex Pigments for that or a gilding wax. I really hope you have enjoyed this little project. Check out the Powertex website for your supplies and a certified tutor in your area. www.powertex.co.uk. For workshops in Polymer Clay and Powertex with me, please visit my website www.birdyheywood.com
 Full step by step instructions and FREE PDF download at the end Powertex is a liquid fabric hardener that comes in a great many other products that can be mixed with it to create all manner of wonderful garden ornaments that are actually weatherproof. There are also many lovely colours to choose from, or one could use the Transparent to bring out the natural colours in the fabrics. (Transparent though, does require a coat of varnish to make it weatherproof). Check out the website for a list of qualified Powertex Tutors in your area and some fantastic blogs from other tutors. www.powertex.co.uk 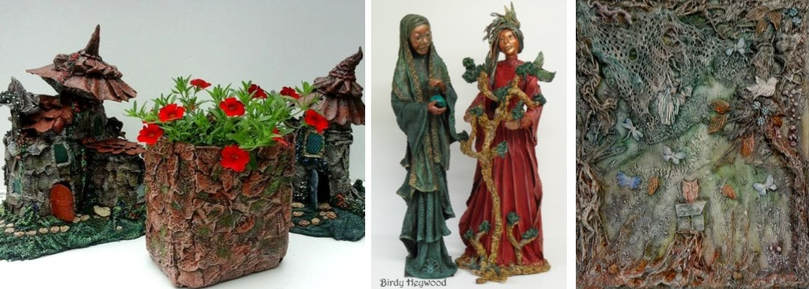 With Powertex virtually ANYTHING IS POSSIBLE. Here are some examples I have created over the past few months. Fairy Houses, Statues for the garden and one of my canvases. I love recycling and making things up as I go along. The magic of creativity is so healing.  1. I used the Stone Art powder to create a lovely air drying clay. 2. On my examples I used the Transparent Powertex. 3. I poured a little of the Transparent Powertex into a plastic container then added a little of the Stone Art powder and stirred it in. I continued to add a little at a time and stirred it in until I had a nice firm clay that did not stick to the sides. 4. Like with dough making I laid it on a tile and continued to knead it. One could also use the Ivory Powertex or and other colour if required. 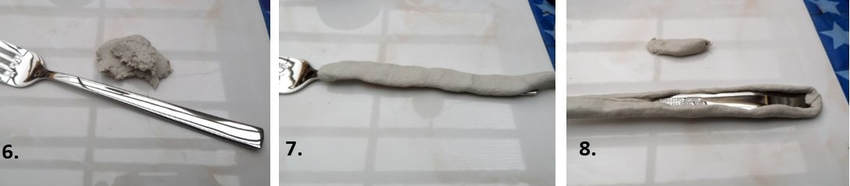 6. I took a little lump of my ‘Powertex Clay’ and flattened it out in my hands. 7. I laid it over the front of the fork and pressed it down evenly before turning the fork over. It is easy to use far to much clay but it doesn’t matter bits can be taken away or added. As you can see in 8. I added a little to fill the gap. It is important to remember to wrap your clay in cling film. It will last for about a week, sometimes longer.  9. There are several ways to create lovely deep impressions in the clay. I am a polymer clay artist of many years and have lots of texture sheets and moulds to hand that I have collected over the time. 10. A knitting needle is one of my favourite tools for creating further folds and indents. The clay does shrink after drying so it is important to create really nice deep patterns. 11. I covered the whole cutlery set and allowed the clay to dry out for a few hours. 12. For the brown set I coated the utensils with Bronze Powertex and allowed it to dry for a while. Sometimes a use a hair dryer to speed up the process.  13. Powertex Colour Pigments are wonderful with an array of beautiful colours. 14. The powder can be blended with Powertex Easy Varnish which also makes the surface water resistant after drying. 15. To highlight the pattern on the Brown cutlery set I used the Mocca Pigment. 15. I mixed the powder with the varnish to form a paint then removed most of the colour on a paper towel. 16. I painted gently over the surface to highlight the raised parts of the pattern.   17. I picked all the rainbow colours for the coloured set. 18. As you can see in the photo I mixed the colours up in the same way as for the brown cutlery set and painted them on to the surface. This time though I did not remove the colour but painted it straight on so that it went into all the grooves. 19. I coated the surface with Easy Varnish . 20. & 21. I used Ivory Powertex to dry brush the surface. CREATING JEWELLERY OUT OF POWERTEX 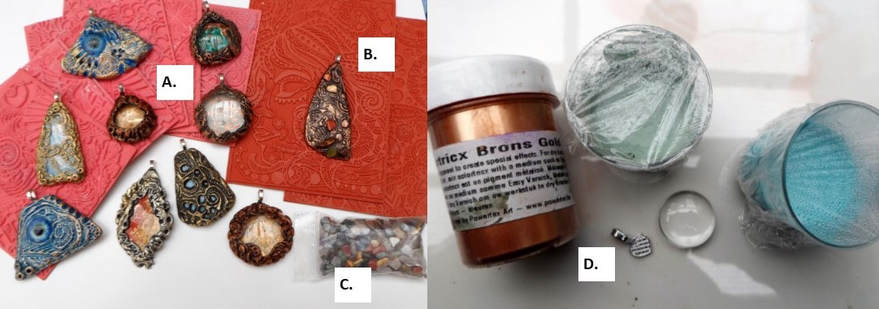 I have collected numerous handy tools over the years. I am a Polymer Clay Artist and love texture. Powertex Stone Art Clay also loves texture! A. Are texture sheets I already had along with pendants created using them. B. Are 2 texture sheets available from www.powertex.co.uk. With a pendant created using one of them. C. A pack of semi precious stone chips. Great to add as embellishments. D. Shows paints created using Powertex Transparent and the colour pigments. In this case I used the Green and the Turquoise (my favourite colour.) and mixed them with Transparent Powertex. The shot glasses are ideal for small amounts. Do remember to cover them with cling film in between and the colours will remain fluid for quite some time. I also used a glass nugget, Bronze colour pigment and a simple pendant bale. 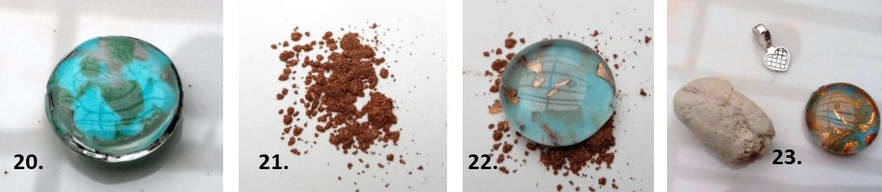 20. I used a paintbrush to dab green and turquoise Powertex Paint on to the glass nugget. I used a knitting needle to create little spaces between the colours if they had merged together. 21. 22. Whilst the back was still moist I laid the nugget face upwards in the powder. 23. Stone Art Clay, nugget and bale. 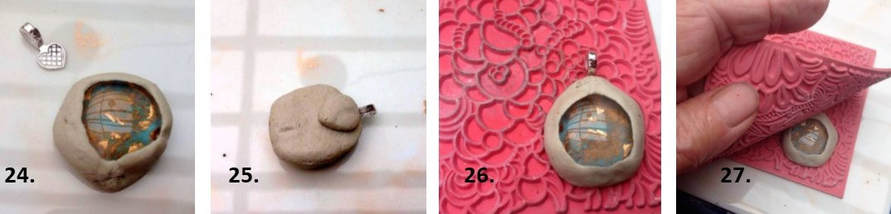 24. Clay laid around the nugget. 25. I attached the bale to the back and added a small blob of clay then turned it all over. 26. The pendant was laid on to a texture pad so that the back also had texture. 27. I pressed another texture sheet over the top to create a pattern all round then left it to dry. 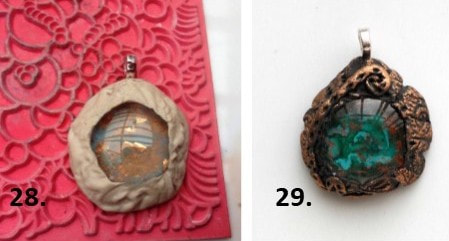 28. Once the clay was nice and dry I removed the pendant from the pad and painted the border with Bronze Powertex and again left it to dry. 29. Finally as a finishing touch, I mixed some Copper Colour Pigment with Easy Varnish and dry brushed it over the surface. One can also use gilding wax or any colours of your choice. Experiment! 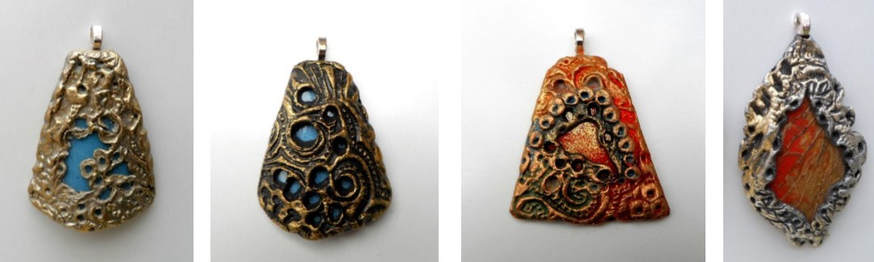 Here are some examples of my experiments. To prevent the Powertex Stone Art Clay from distorting whilst it dries, I have inserted a small sheet of plastic cut into the shape of the pendant I wish to create. The plastic also has an advantage that it can be painted as with the glass nuggets. Alternatively one could stick coloured Powertex Stone Art Clay to the back. 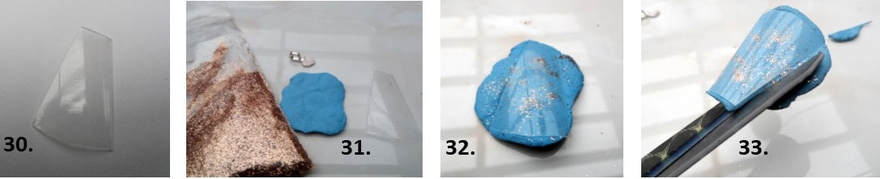 30. For this particular pendant I used the corner of a plastic container which was conveniently curved to give the pendant an interesting shape. 31. I have used ultra fine glitter for this project. 32. I flattened a little blue clay then sprinkled the glitter on it before securing it to the back of the plastic. 33. I found that using scissors to trim the edge was an easy way to secure a neat edge. 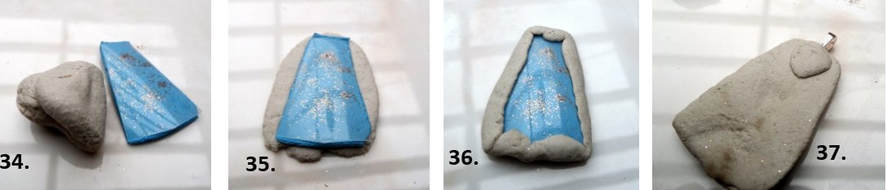 34. I wanted to bulk the back out as well to give the pendant more weight so I pressed it on leaving a little overlapping. 36. The clay is so easy to manipulate so I eased into place. 37. As with the last pendant I attached the pendant bale and turned it over and laid it on a texture sheet. 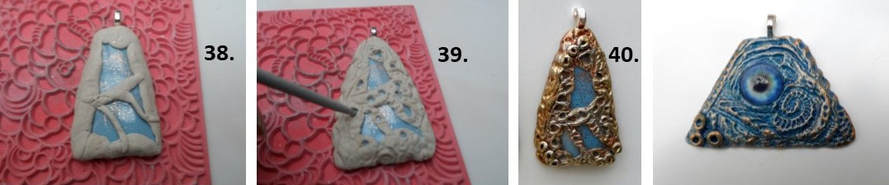 38. I wished to give this one a sort of lace effect so added a few little sausage shapes then pressed a texture sheet on the top. 39. I used my knitting needle to create grooves and push the clay around a little. 40. Once dried I used the gold Colour Pigment and painted it over the surface. The last pendant was created using a pyramid shaped piece of plastic where I removed the top. The glass eye I had ordered from EBay. After it had dried I painted it with blue Colour Pigment then dry brushed it with copper and gold.
Learn how to make Magical Mirrors with ‘POWERTEX’ Designed by Birdy Heywood 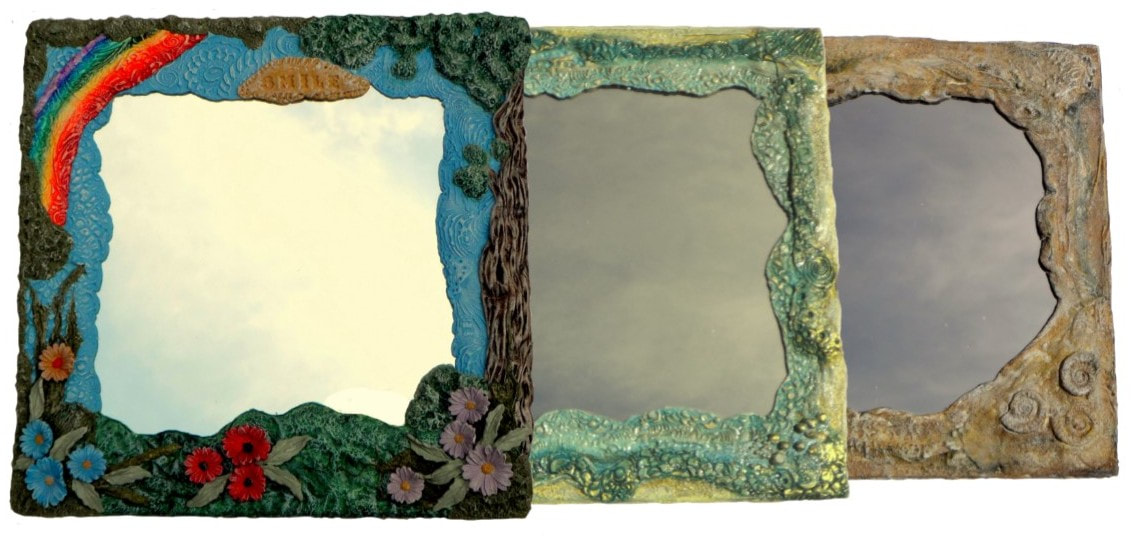 .A LITTLE ABOUT POWERTEX Powertex is an environmentally, water based fabric hardener and comes in a great range of colours. if using natural fabrics that completely absorb it, after 3 weeks it is entirely weatherproof. The Transparent however is not weatherproof unless varnished afterwards with Powertex Easy Varnish. Powertex is more than just a fabric hardener as it comes with a great range of related products. Textures, colour pigments, moulds, Stone Art Clay, Fibres, Bister (A water based product that sprayed on to a canvas gives amazing effects) Check out the website for a list of trained tutors in your area. www.powertex.co.uk 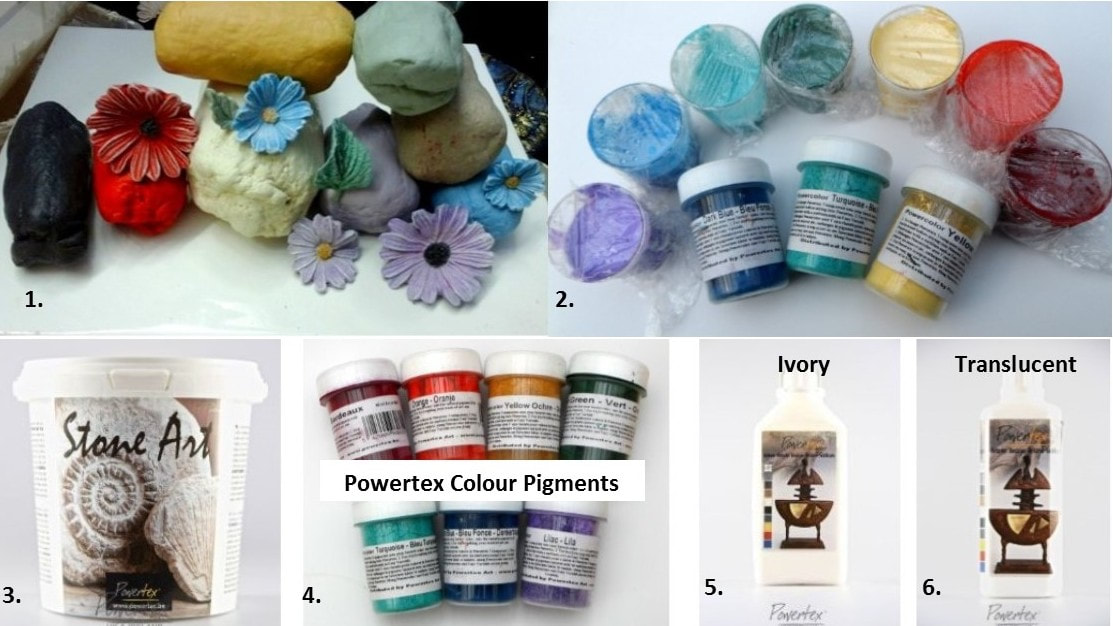 I have been working with Polymer Clay for over 30 years and I wondered what it would be like to create similar things out of Stone Art Clay. In 1. you can see all the lovely colours I mixed in readiness and also the little flowers made from the Powertex Daisy Mould. 2. Shows my little tubs of rainbow colours. The paints were made by mixing Transparent Powertex with some of the Colour Pigments. If you would like the shades to be more pastel then mix in a little Ivory Powertex to lighten it up. When mixed cover with cling film and the colours will last for quite a few days. The little plastic shot glasses can be washed out afterwards to use again. I will explain next how the Stone Art Clay was created. Creating the Coloured Clay 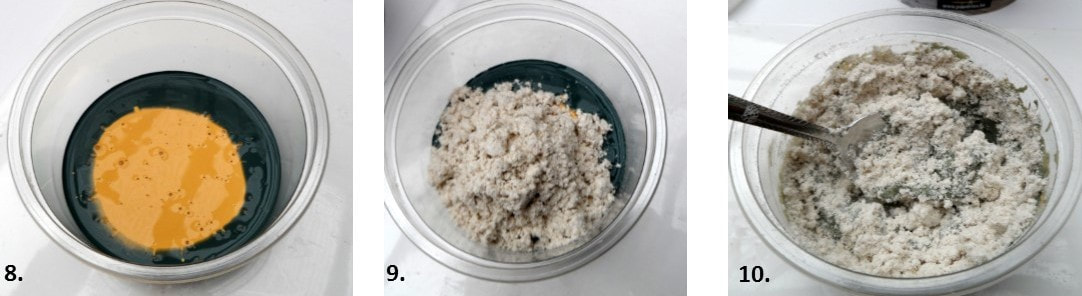 To mix a nice green shade I used a little plastic container that once contained a tasty strawberry mousse. Powertex does not stick to plastic so it can be washed out and used again. I mixed Yellow Ochre Powertex with an equal amount of Green Powertex. I added a little Stone Art powder and stirred. Then kept adding a little more and stirred it in. 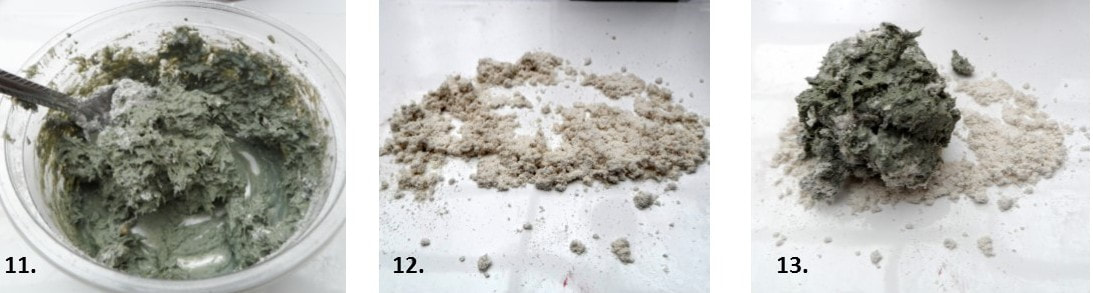 I kept adding the Stone Art a little at a time until the mixture was nice and firm and came away easily from the sides. Next just like when making bread dough, I sprinkled a little of the powder on to a ceramic tile then added the clump of mixed clay. Then I kneaded it until it was no longer sticky adding a little of the powder when needed. 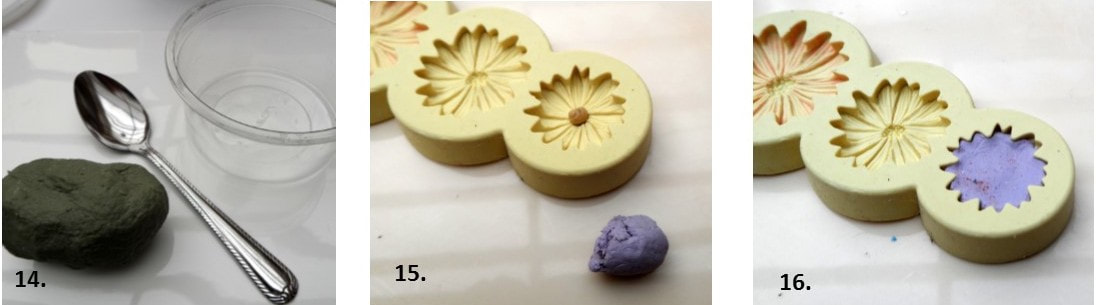 14. Like a responsible ‘recycler’ I washed the tile, the spoon and the container. 15. Shows how I created a little lilac daisy. I placed a tiny ball of yellow clay in the centre of the daisy mould. The Lilac Clay was created by mixing a little Lilac Colour Pigment with Transparent Powertex before adding the Stone Art Clay. I just pressed it firmly on top of the yellow and hey presto, a beautiful daisy! With some of the clay I added Ivory Powertex to create a lighter colour. Experiment! Remember to wrap the clay in cling film and it will remain pliable for quite some time. 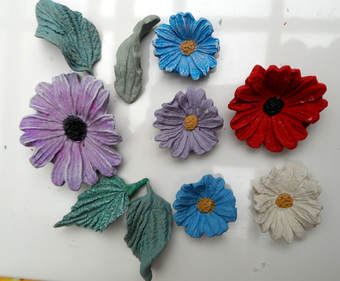 Some of the little flowers I created using the daisy mould and Bramble Leaf Veiner. 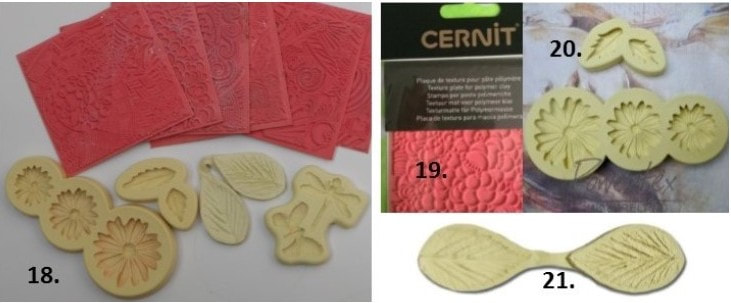 Flexible Texture Sheets used for the mirrors. Available from www.clayground.co.uk Daisy and daisy leaf mould available from www.powertex.co.uk. Bramble Leaf Veiner available from www.sugarcity.co.uk Just a little bit more info before we get started on decorating the first mirror tile. 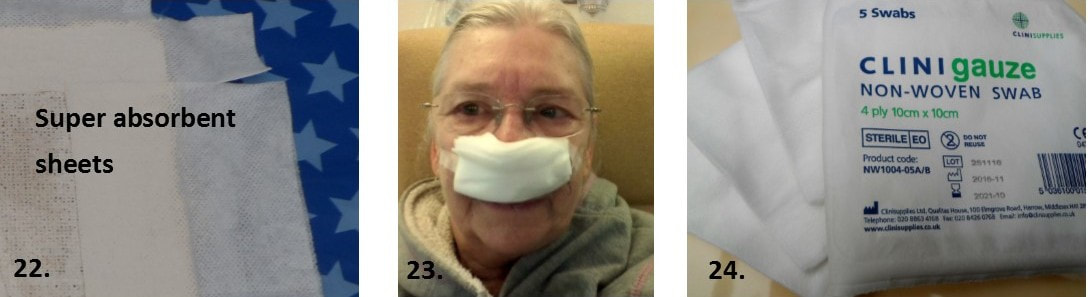 This is rather a funny story really, but true. When I was chosen to be on the Powertex UK Design team this year, there were these sheets of sort of soft cottony stuff in with my samples. I recognised it as a material I had used ages ago with a different fabric hardener and had found very useful. I wanted to use them on my mirrors so I asked Tracey Evans of Powertex UK Headquarters where I could find more. She answered that it was just the packaging but thought it might be clinical swabs. Well I got the proof a couple of weeks later when I had quite a bit of it plastered to my face after an operation on my sinuses. Great stuff and I will be using it in future projects too. Not a very flattering photo of me though. 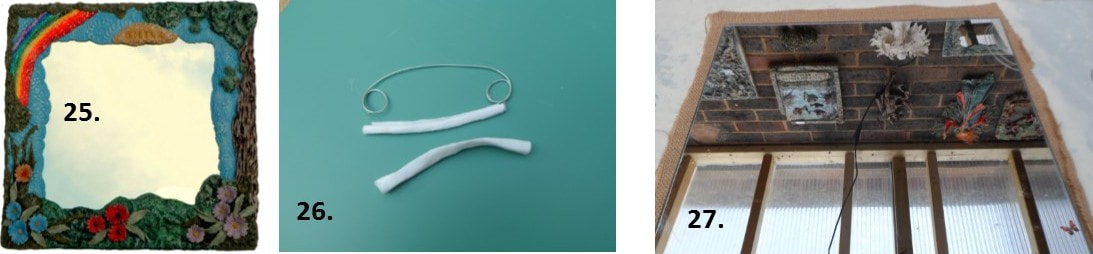 Now the exciting part begins! 26. Shows how I bent a length of gardening wire so that it had a loop on each end. 26. I also cut out two lengths of t-shirt material. 27. I used jute for the back of the mirror because it is really absorbent. Besides I was given quite a quantity of it. I laid the mirror tile on top of the jute then cut around it so that about an inch protruded on the sides. I must also add that most of the project can be created in a seated position. Also no need to dip large bits of fabric into the hardener as I designed this project so that I didn’t have to stand for any length of time. 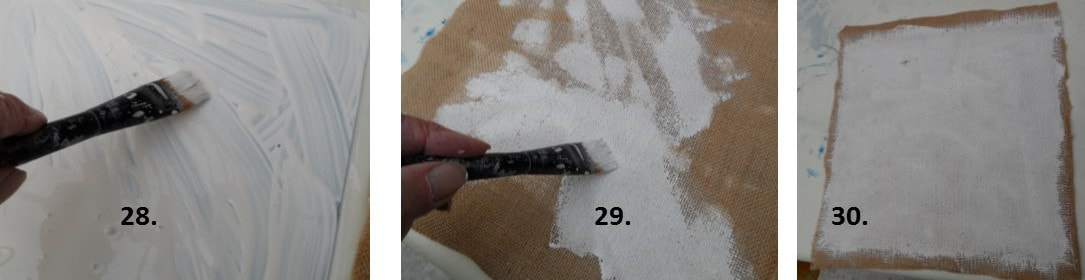 28. Using a paintbrush I painted a generous layer over the whole of the back of the mirror. 29. As I mentioned, jute is really absorbent so it was easy to paint a little more over the surface to bond with the Powertex on the back of the mirror. Ooops, nearly forgot…..I used Ivory Powertex. 30. I used a hair dryer to dry the back slightly before using a pair of scissors to trim the jute so that it was flush with the edge of the mirror.  31. I fixed the wire to the back of the mirror ensuring the strips of t-shirt material were well saturated with the Powertex. Now it was time to use the clinical swabs from picture 24. They were so easy to attach to the back of the mirror just using the paintbrush and Powertex. One could use ordinary material but that would require dipping it into the Powertex so that it was entirely saturated. I don’t get messy if I don’t have to! I applied each folded sheet so that it overlapped by about 1 ½ inches. Next I used a hair dryer to dry the edges then laid a plastic bag over the wire hanger so that I could turn the mirror over.  34. I turned the mirror over and used a paintbrush to coat a layer of Ivory Powertex directly on to the top of the mirror. 35. After I had folded it over I added another thin coating of Powertex. You will be surprised at just how easy it is using these absorbent sheets! I repeated the procedure all the way around until all the sheets were neatly adhered to the mirror.  37. As you can see I wasn’t too careful to get it all even. I like to have wet wipes handy to clean up the over painted bits and paper towel to dry it. Much easier to keep it clean as you proceed. 38. Some Stone Art Clay I had mixed earlier. I used Ivory and a dash of Transparent Powertex. This was to be grass so I laid it on quite thickly leaving little lumps and bumps. 39. A wire brush is great for creating texture! (You could also use Green Clay instead.)  40. This is where the ‘Paint’ I had mixed earlier came in. It was made with Transparent Powertex and Green Colour Pigment. 41. After I had coated it all I used the hair dryer to dry the surface, then very gently, with a wet wipe stroked over the top to remove a little of the surface colour. Then I dried it again before pinching here and there with my fingers to give the grass even more texture. This works well at this stage because the clay will still be soft enough to manipulate. 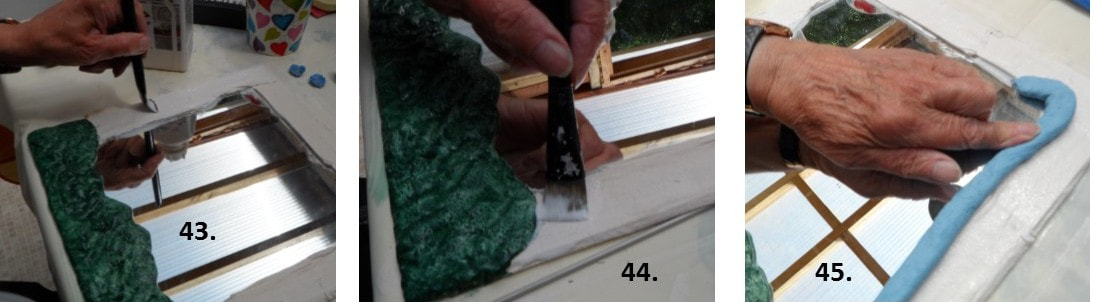 43. For the blue clay to adhere to the mirror I coated a layer all the way round. If halfway through adding the blue you find it has dried out, you can always add a little more. 45. I love this shade of blue. I created it with Blue Powertex and also Ivory and Stone Art Clay. If you do not have Blue Powertex then use the colour Pigments instead. The Clay is wonderful for just spreading it out with your fingers. I created a long sausage shape laid it slightly over where the wet Ivory had been painted and pressed the inside down first to create a nice, neat contour. Once stuck down I just pushed the clay towards the edge. 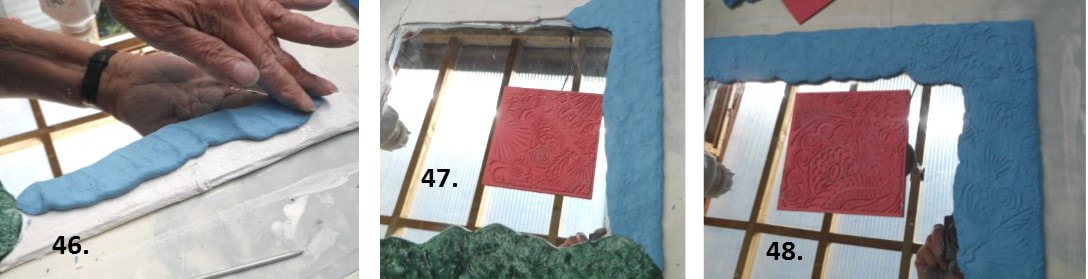 46. I gently manipulated the blue clay and coaxed it to the edge adding more when needed. 47. Next I chose one of my texture sheets and pressed it firmly all over. 48. I covered the top with the blue and chose a different texture sheet and did the same. (I love these texture sheets because they are flexible and can be pressed over the curved bits.) When I later dry brushed Ivory Powertex over the surface the patterns really showed up.  49. I chose another different sheet for my final side. 50. It doesn't show up too well but I also created some brown clay using The Stone Art, Ivory and Bronze Powertex. I the formed some long, thin, sausage shapes for the tree trunk. I must apologise for the bad quality of some of the photos but it isn’t easy to create and take photos in between. 51. I added some Transparent Powertex so that the tree had something to adhere to. 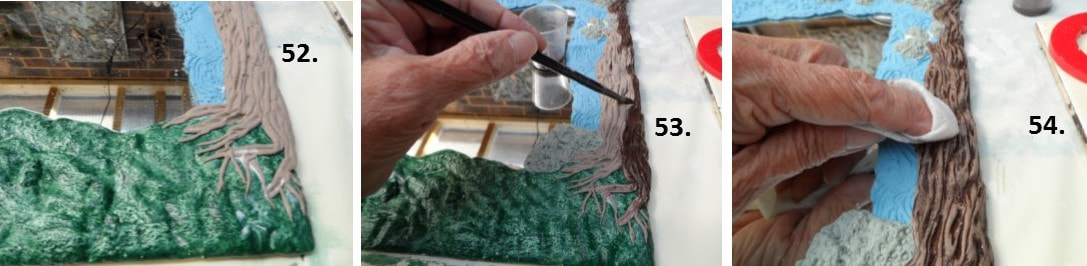 52. This whole project was an experiment for me so I tried creating little roots at the base of the tree. I didn’t like them so later covered them over as you will see in photo 57. This is where things really started to come alive! 53. Using a small paintbrush I painted Bronze Powertex all over the tree, making sure it went into all the grooves. 54. I allowed it to soak in for a bit, so had a cup of coffee! Well a girl does need a break sometimes! Wet wipes are handy things and here was a good use for them. I very gently rubbed over the surface to remove the colour from the protruding bits. Later I dry brushed it with Ivory Powertex. 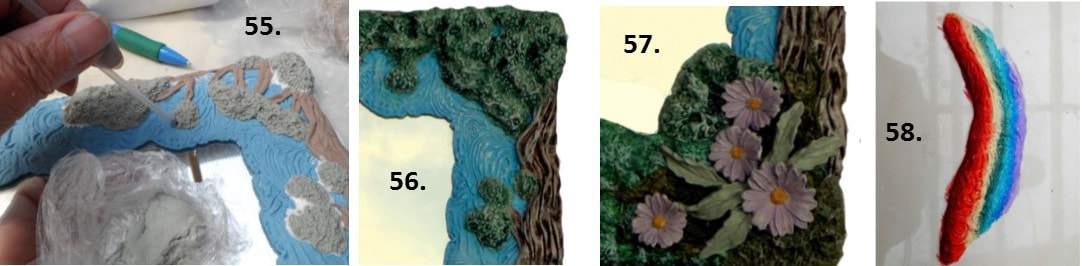 55. I have no idea where the little drinking straw came from which ‘just happened’ to be on my table (probably the fairies) so I used it to create some lovely texture on the blobs of green clay which I had added. As with the grass at the base I gave it a coating of the green paint. Photo 56. shows how it looked after I had dry brushed it with Ivory Powertex. 58. I still had a little of the plain clay left so formed it into a rainbow shape, stamped it with a texture sheet then painted on the colours with a paintbrush. This was then adhered to the mirror using the Transparent Powertex. 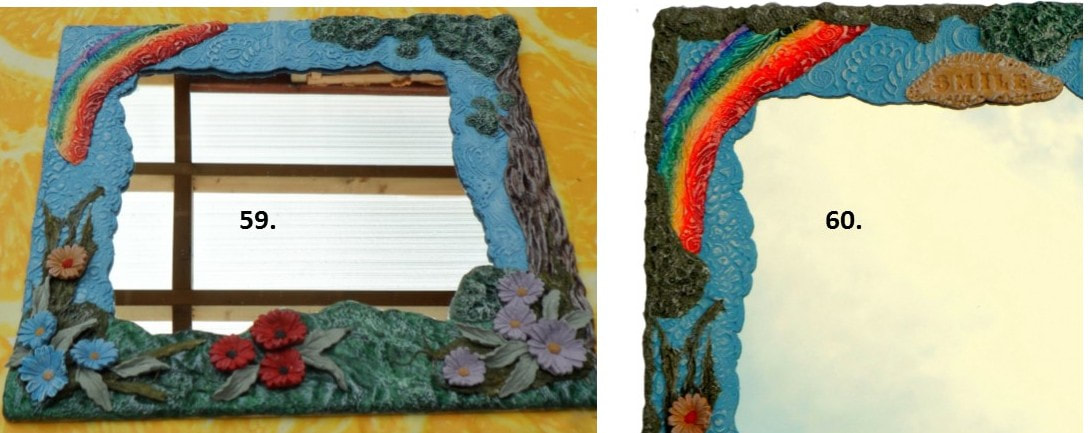 59. Once I had added the rainbow I realised it looked a bit lost and didn't reach the edges. Instead of removing it and creating a bigger one I decided to add a little more foliage to the corner instead. I think you will agree, it looked better like that. 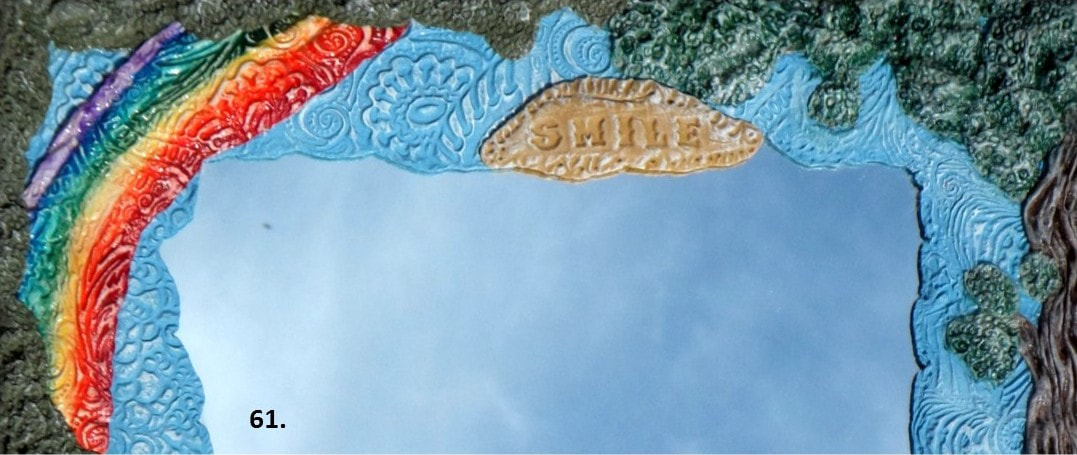 61. It now just needed a finishing touch to the top. Instructions for using this Magic Mirror. You see if you follow the instructions a smiling face will appear! Look how great the dry brushed areas look! For those of you who do not know what dry brushing is: Place your brush into some Ivory Powertex then remove most of it on a paper towel and I mean MOST of it. Then lightly stroke over the raised areas. This will give your creation fantastic depth. 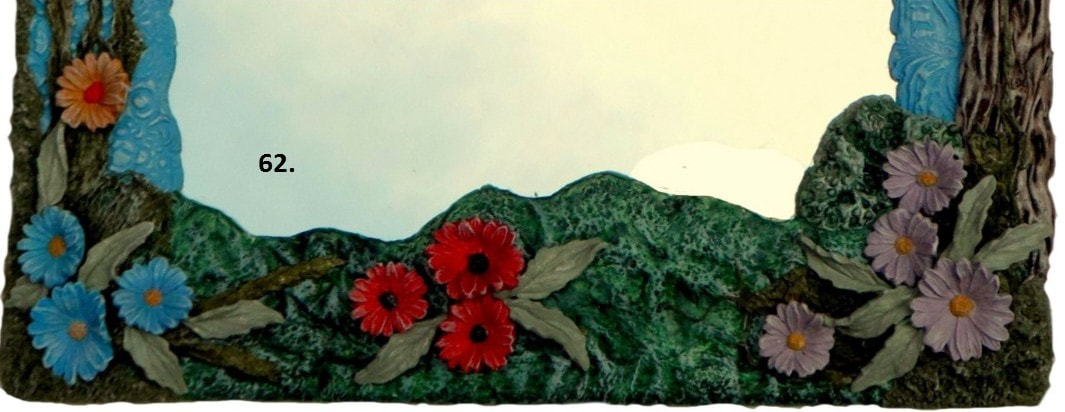 62. All the little flowers I had created using the daisy and leaf mould from www.powertex.co.uk were added using the Transparent Powertex. This mirror just seemed to evolve as I discovered more and more about the properties of the Stone Art Clay and mixing the colours. That is what it is all about, having fun and experimenting. 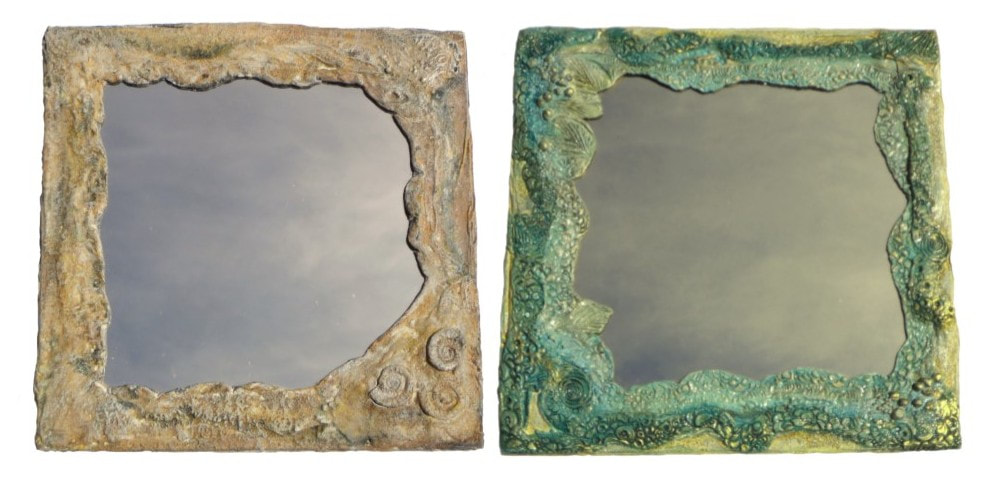 Just a little about the two other mirrors 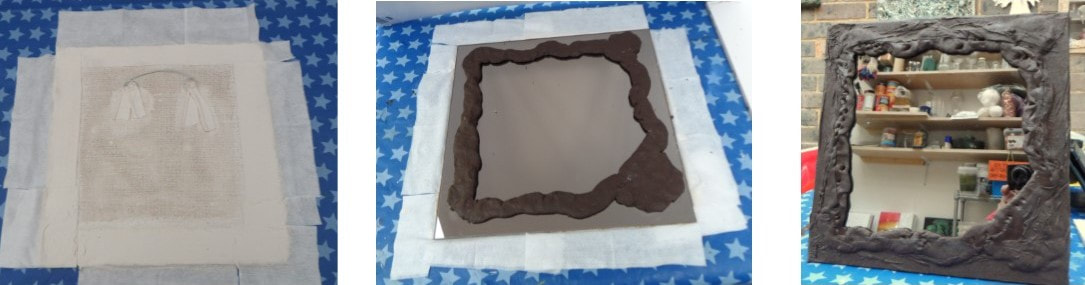 With both of these I began the same way. Stuck jute to the back then the hanger. With the stone mirror, I create some bronze Stone Art Clay and stuck it to the mirror using the Transparent Powertex. With a paintbrush I added more bronze and pushed the swab sheets in position leaving them wavy in places. I haven’t any photos of adding the Stone Art Powder but will cover that in a later blog when I work with the lovely ammonite moulds again. (These are available from www.powertex.co.uk)  Some close ups of the lovely stone effect. This is great fun to do and it really does resemble stones and rocks. 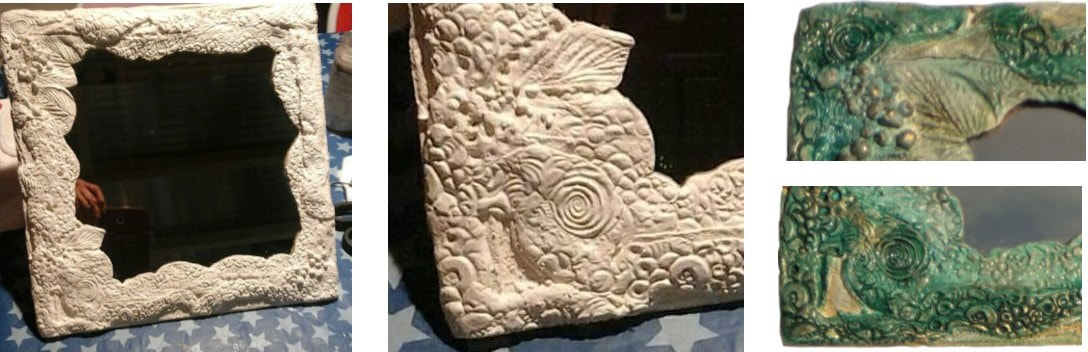 I call this one my fancy mirror. I used the Texture sheets for this and had great fun doing so. This time though I applied coloured Bister with a paintbrush (another Powertex product) After I had applied the colour I varnished the whole thing. I hope you enjoy the projects, Check out the other blogs on the Powertex website. Loads of inspiration and examples of how to create some really exciting projects. 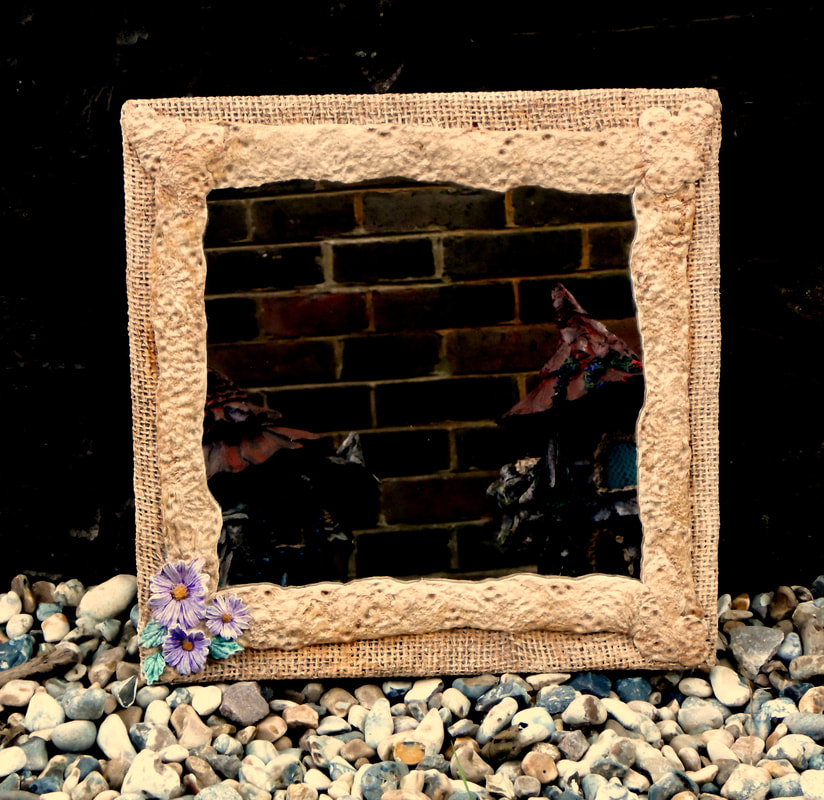

As a member of the Powertex Design Team 2017 we were asked to pick 4 subjects to cover for our blogs. One option I chose was ‘something in the style of an artist I admire.’ There are many, but 2 artists appeal to me the most. Those are both Gaudi and Dali. Probably because my own style is more surrealistic rather than realistic. I love all things organic. Gaudi’s art simply oozes with a connection to growth, movement and to the earth itself. Creating helps me to bring to the fore, my deepest feelings. Some are happy and others are more thought provoking, both allow me to release them and set me free. Art is all about expression. I see it as a language. A language that can be interpreted in several ways according to the person who creates it and those who observe it. 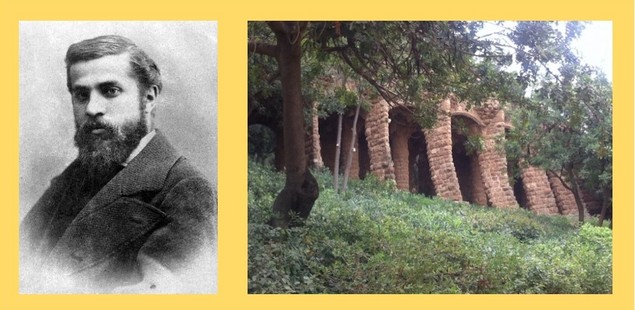 Gaudi’s buildings grow out of the landscape as if they had been there for hundreds of years. 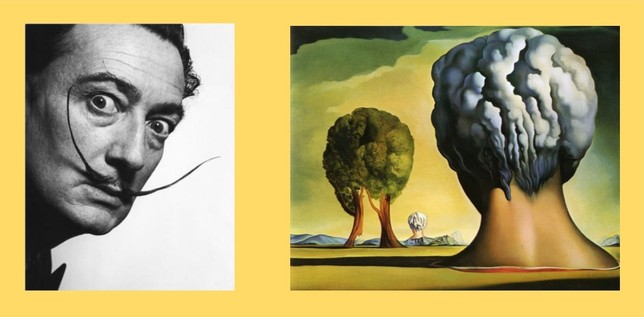 Dali, well I just love his work too. He dared to leave reality behind and express himself in the most peculiar of ways. * Now to my own particular work of art First of all I want to tell you how this came about. Many years ago, an ex partner of mine was jealous that he had not been part of my past. He showed dislike for my much treasured paintings and drawings dating back from the time when I was a teenager. I dreamed then of becoming and artist. Stupidly, as a token of my affection, I made a fire and threw all of my paintings and sketches on it to be consumed by the flames.  ,This picture is the only one that survived. I sketched it with a ball point pen on a scrap of paper when I was 13 years old whist on a visit to Germany. A relative scanned it and sent it to me a few years ago. Seeing it again caused many emotions to resurface. Not a bad thing as you will later see. Teenage years as we know, are difficult. As a victim of abuse when I was seven, I often felt trapped, dirty and useless. Drawing helped me to express myself and I drew many such heads growing out of the ground. Heads with no arms, no bodies. The surrounding landscape was hostile and barren. Somehow these bodiless heads had survived, silently observing the destruction of what had once been a beautiful world. My family called me ‘weird.’ I see now that what I was expressing, was that feeling of being helpless and trapped. As I took this idea further my POWERTEX Creation released me. ‘The Release’ 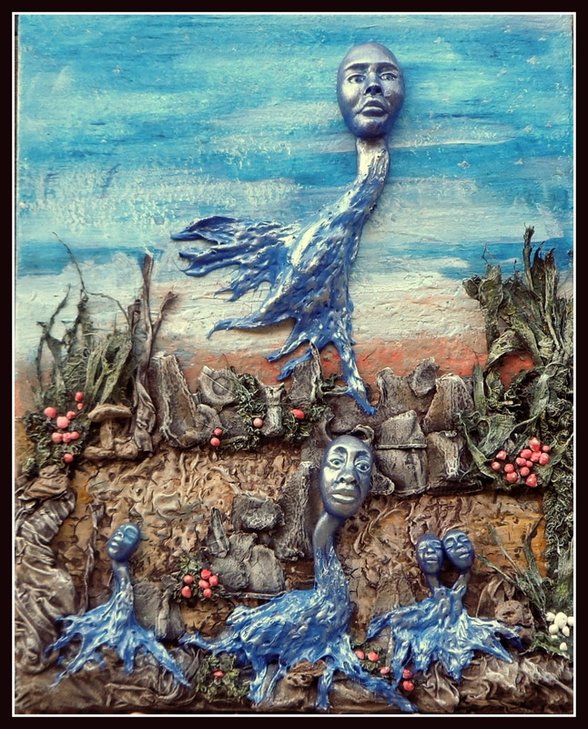 ‘The Release’ Dali created, heads growing out of the ground, strange creatures with long spindly legs, melting clocks that defied space and time. Gaudi erected the strangest but also the most beautiful of buildings, each with a life of its own and a message with each of them. I decided to use my strange bodiless heads from childhood to set me free. One of the heads had to break free and I felt it was to be me. I knew that with Powertex this would be possible, more effective and enjoyable than just a drawing. Besides, each month all Powertex Trainers have a challenge set. This is just for enjoyment so no pressure. During the month where a ‘Collage’ was the subject, I decided it was my chance to tackle the subject of letting go. As with everything created from the heart and deep subconscious, I was very emotionally charged. Apart from the heads themselves which I created out of polymer clay using my own moulds, the rest of the creation was made using only Powertex products. 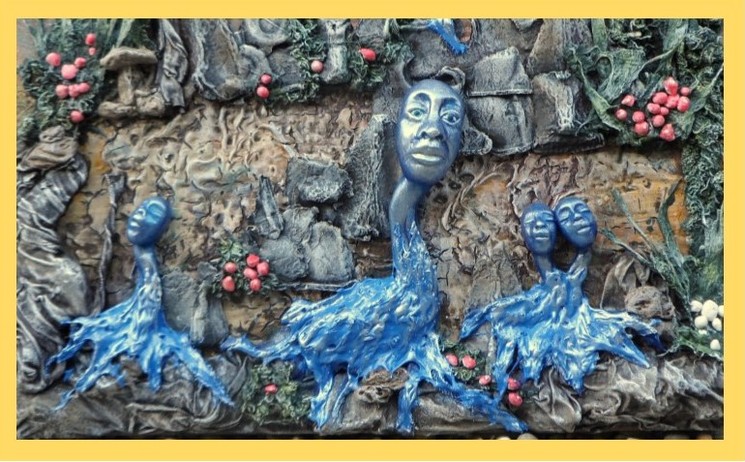 The heads trapped on the ground were rooted on the rocks. I created the rocks using natural fabric soaked in Bronze Powertex. The background was created using Easy 3D Flex. This is great as it cracks whilst drying revealing crevices. I created the heads out of polymer clay 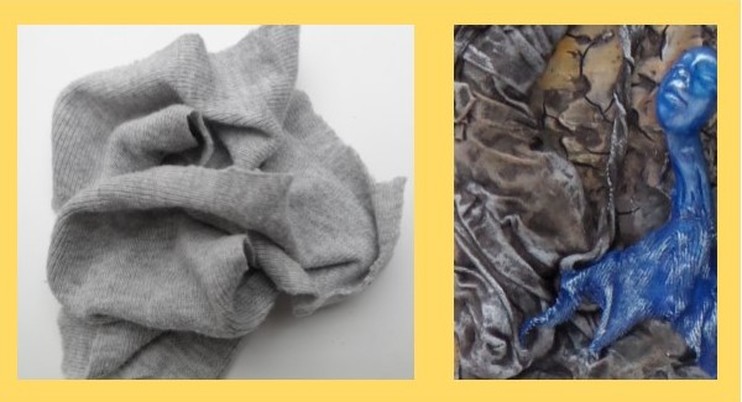 I used an old t-shirt for the rocks, then when dried I used lighter colours and dry brushed it to bring out the texture. (More on dry brushing later.) 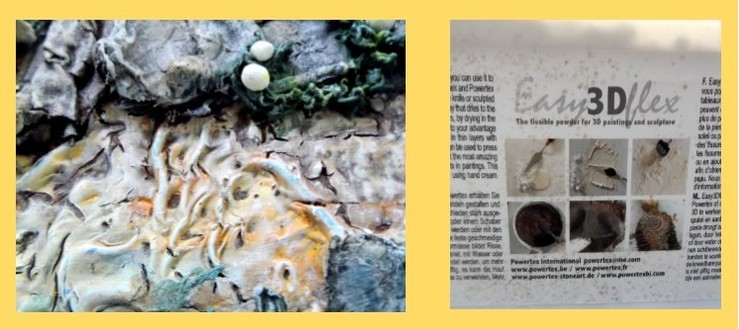 Easy 3D Flex is great for creating the texture of the dry, cracked, earth 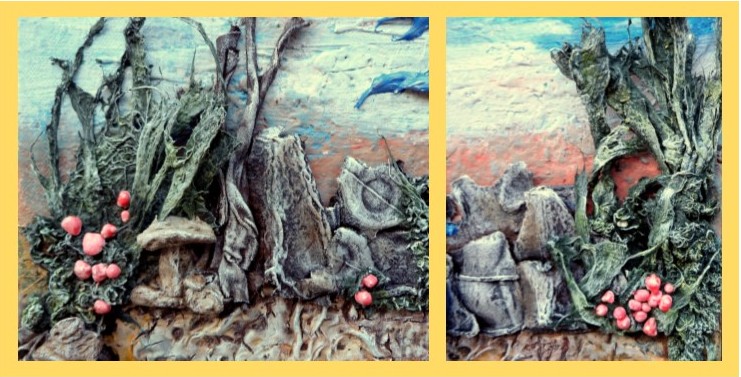 Gaudi’s style influence me whilst creating the rocks with strange shapes. For these I used torn up egg cartons. The foliage was created using Paper Dec and the little berries using Sand and Balls. Both Powertex products. I used Powertex Hardener Green for the foliage and Bronze Hardener for the rocks. 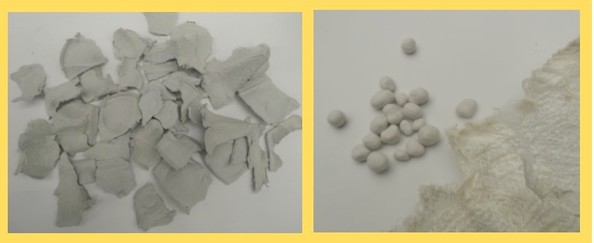 I love the texture of egg cartons. Hah, Hah, little things please little minds and I am easy to please. 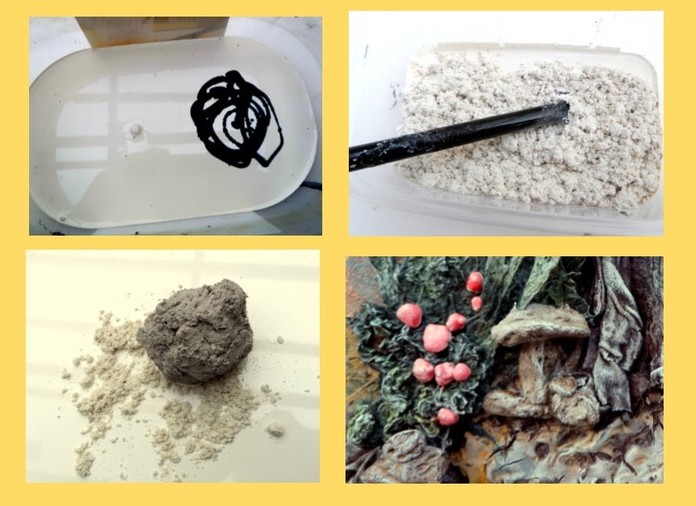 I mixed a tiny bit of Bronze Powertex with some Ivory to create a clay like shade then added Stone Art to create a clay that I could form. With this I created little rock formations. 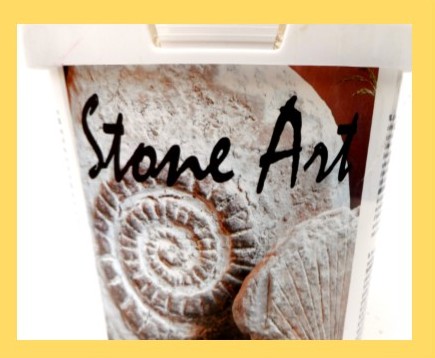 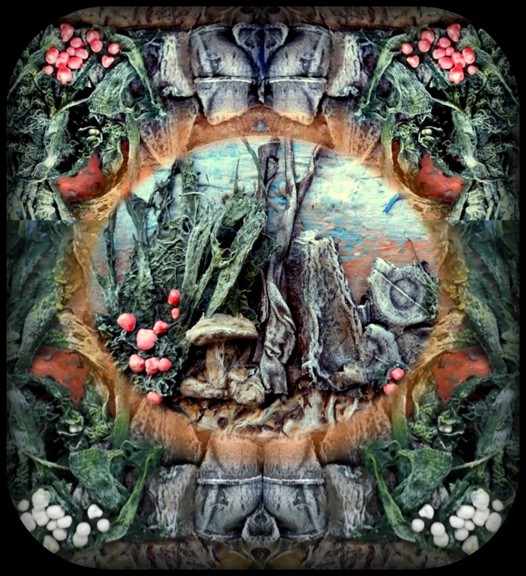 Once I have finished a canvas using the Powertex
I find such wonderful textures to play with in a photo editing programme called Picassa. Anything is possible CREATE YOUR DREAM 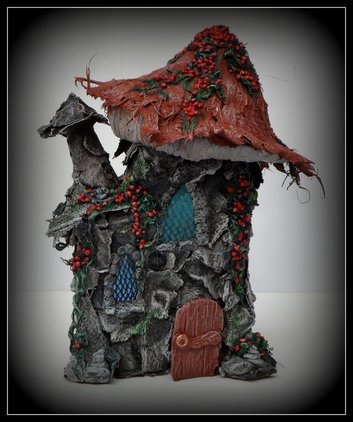 Well here I am again with my second post....gradually getting the hang of this. So a little more about my Powertex Journey! As most crafters, I see things and think, "Oh I wonder if I could use that?" The result is a vast accumulation of what I can only refer to as "THINGS." For instance, nice bits of lace, interesting shapes and moulds, glass bottles and jars, egg boxes, cardboard boxes, candle holders, broken or chipped china........oh the list goes on. It was looking at my plastic milk containers that I "saw" A Fairy House! Not just any fairy house but one with an open door and leaded windows. I suffer from claustrophobia, so I hate closed doors and windows and even in winter sleep with the window open. I am sure Fairies also like to be able to come and go as they please. "Hmmm" I thought looking at the egg boxes which had now grown into a huge pile. Torn up cardboard with such a lovely texture, would make excellent brickwork. So I set to work and 3 days later the little house looked like this. I took photos of each stage and am now working on a step by step for you to follow. The house isn't actually finished yet, as the fairies, (they chattered continually in my little studio making suggestions) Well they have asked me to build them a grass mound with steps leading up to the house. Fussy Fairies! I love them though. Ok now for a little treat connected to recycling. Below is a step by step on how to create a lovely plant pot holder out of a plastic carton. 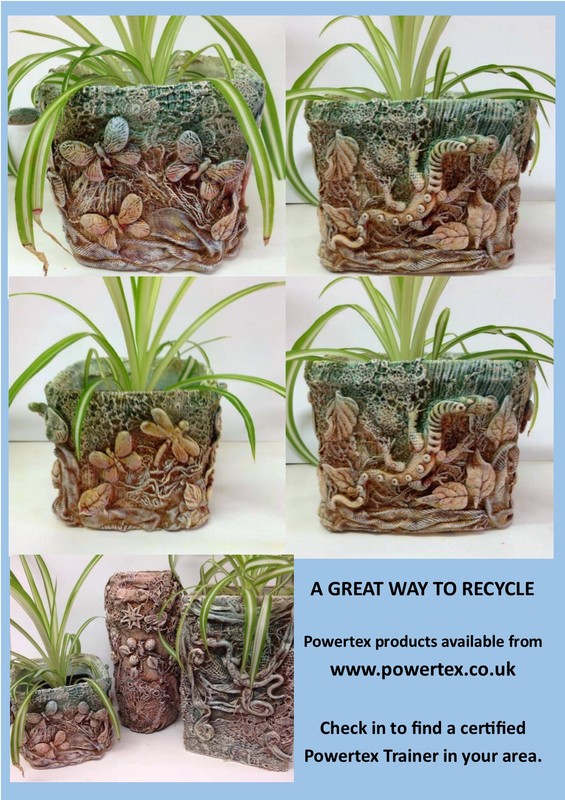 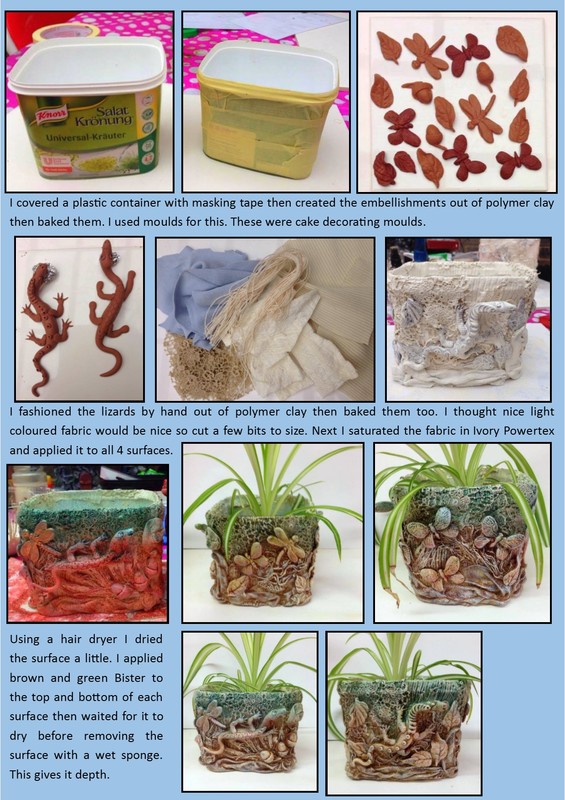 Hi everyone, First of all a little bit about my background, interests and skills. My name is Birdy Heywood, and I am a 'Recycled Teenager' nearing my 70th year. Many of my generation can relate to the phrase, MAKE DO AND MEND. Old clothes were unpicked and made into clothes for the children. Even the food from yesterday was recycled into an invented dish. I suppose we just had to learn to be creative but it was a fun challenge. In my early twenties I created handbags and clothing out of scraps of leather in order to sell them at markets and to friends. Then followed premature baby clothes made from old T Shirts. This evolved into sweatshirts with applique. After many years Polymer Clay entered my life. "Wow," I thought and realised that I could be really creative. I taught myself how to model, figurines, dragons, fairies and jewellery then went on to teach and demonstrate in schools and at exhibitions all over the country. Polymer Clay is baked (hardened) in an ordinary oven so I could only create smallish things. Fabric Hardener came into my life and opened a whole new world for me. I found that I could create the bodies out of wire, the heads and hands out of polymer clay then clothe them with natural fabrics. The great thing about the Fabric Hardener I use which is called Powertex is THAT IT IS WEATHERPROOF and can be used for garden ornaments. As I mentioned I love to recycle and with POWERTEX I can do just that. Old canvases can be treated with Powertex to create a whole new work of art. Ok let me list a few things here to wet your appetite: Cardboard boxes can be transformed into plant pot holder, bottles into candlesticks, with a few scraps of material and some wire, one can create a beautiful sculpture, old mirrors can be given a magical face lift, picture frames too and the list goes on.....! I am now honoured to have been chosen as a member of The Powertex design Team. UPDATE: I NO LONGER USE POWERTEX BUT ALL PURPOSE WOOD GLUE. IT IS LESS EXPENSIVE AND WORKS JUST AS WELL. Here as an example of a plant pot holder that was once a plain old cardboard box. At a later date I will post examples with step by steps. Just have to get my head around creating this first ever blog.... 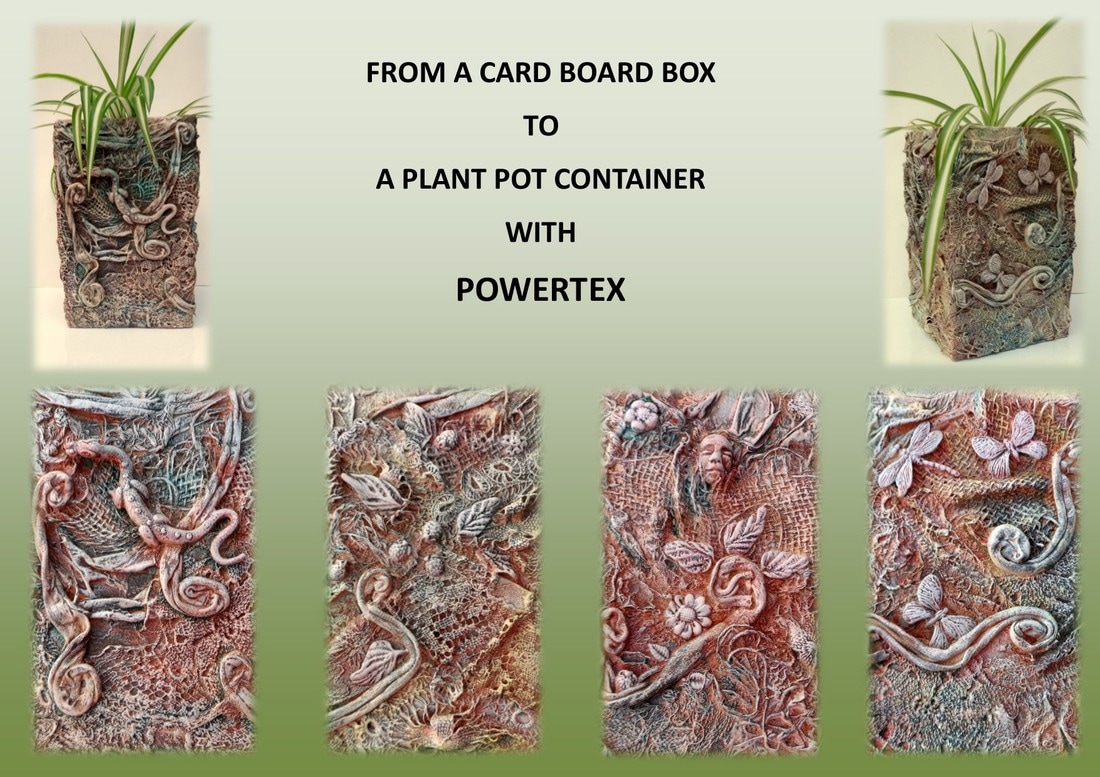 |
||||||||||||||||||